CS2 Anubis callouts are the 45 location names players use to communicate on the Anubis map in competitive Counter-Strike 2. The Anubis map splits its callouts across five zones: A Site, B Site, Mid, T Spawn, and CT Spawn. Key names include Palace, Heaven (A and B), Water, Gate, Connector, Bridge, Sniper's Nest, and Ivy.
Anubis arrived in CS:GO as a community map in 2020 and entered the Active Duty pool in November 2022, replacing Dust II. The map carried over to CS2 in August 2023. After a six-month break, Anubis returned to Active Duty on January 22, 2026, replacing Train for Premier Season 4. Callout fluency matters again for Premier and FACEIT play.
Below: every callout by zone, a full reference table, and tactical sequences for T-side and CT-side.
Full Anubis Callout Map Overview
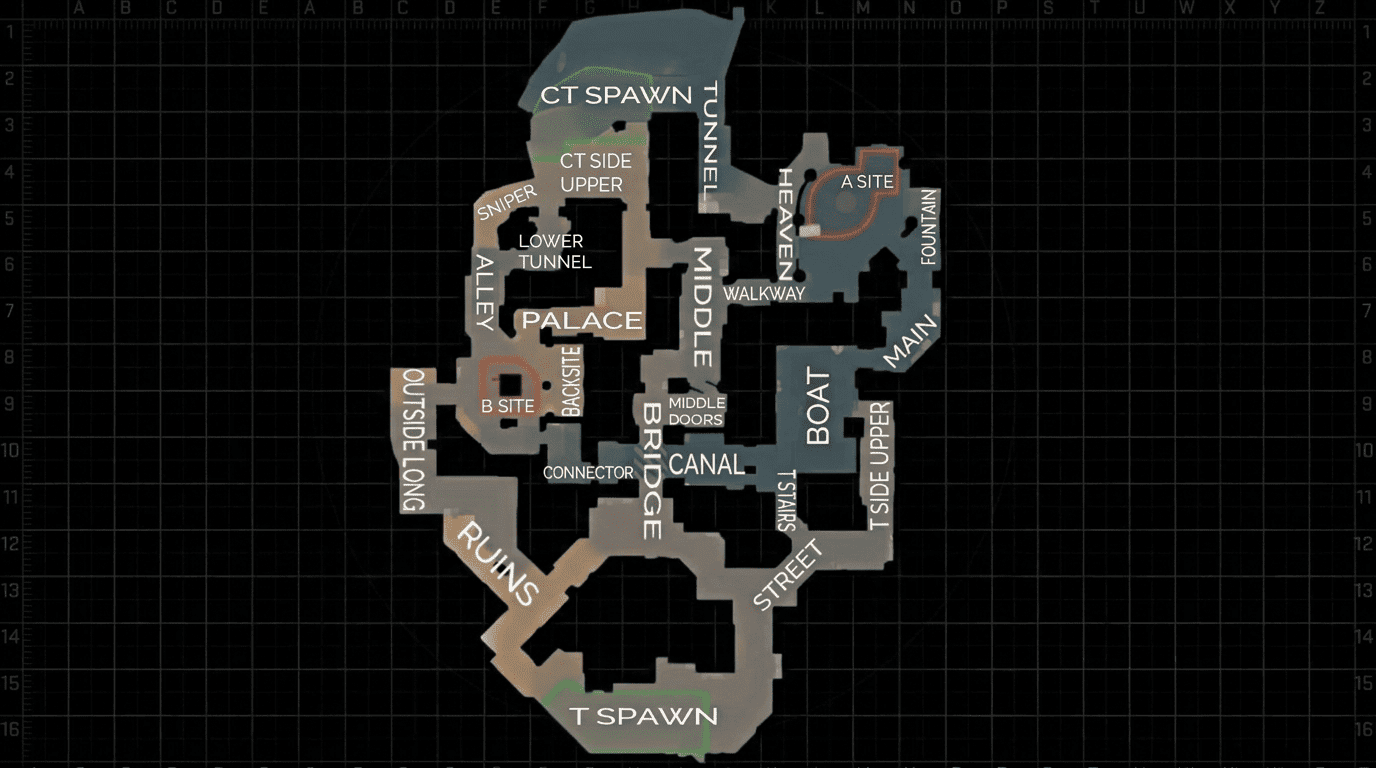
The Anubis Callout Map below condenses every named location on the map into one reference. Bookmark this page and pull it up between rounds.
The table groups all 45 callouts by zone with a one-line description of each. Use it as your map locations cheat sheet while the visual key sinks in. The five zones (A Site, B Site, Mid, T Spawn, CT Spawn) line up as row groups so you can scan a zone fast and find what your teammate just called.
| Callout Name | Zone | Brief Description |
| T Spawn | T Spawn | Terrorist starting area |
| Alley | T Spawn | Corridor right of T Spawn toward A Site via Upper and Boat |
| Ruins | T Spawn | Transit space between T Spawn and B Long |
| Trash | T Spawn | Narrow connector between T Spawn and Ruins |
| Top Mid | Mid | T-side approach to Bridge and Mid |
| Bridge | Mid | Long pathway from Top Mid down to Double Doors |
| Double Doors | Mid | Transit zone between Bridge and Middle |
| Middle | Mid | Central corridor connecting A, B, and CT |
| Arches | Mid | Landmark separating Water and Boat |
| Upper | Mid | High platform above Water |
| Drop | Mid | Jump-down from Upper to water corridor |
| Stairs | Mid | Stepped path connecting water level to Mid |
| Water | Mid | Lower flooded corridor, also called Canal |
| Boat | Mid | Water zone adjacent to A Main |
| A Main | A Site | Primary T-side approach to A |
| A Site | A Site | Bomb plant zone with central pillar |
| Heaven (A) | A Site | High position overlooking A Main |
| Back A Site | A Site | Rear area behind the A plant |
| Plateau | A Site | Transition between A Con and A Heaven |
| Fountain | A Site | Landmark for grenade lineups near A |
| Orange | A Site | Orange scaffolding beside Plateau |
| Headshot | A Site | CT wall angle with headshot-only peek |
| Tunnel (A) | A Site | Indoor path from CT Spawn to A Heaven |
| A Connector | A Site | Mid-to-A-site route, called A Con |
| eBox | A Site | Granular cover callout near A Connector |
| B Site | B Site | Bomb plant zone on the B side |
| Default | B Site | Standard plant near the central wall |
| Pillar | B Site | Central piece of geometry on B |
| E Box | B Site | Post-plant cover spot |
| Corner | B Site | Retake-relevant angle on B |
| Back Site (B) | B Site | Rear of B bombsite |
| Gate | B Site | Primary entry from B Long |
| Ivy | B Site | Pre-execute staging area near Gate |
| B Long | B Site | T-side approach to Gate, also Catwalk |
| B Connector | B Site | Flank route from Water to B |
| Heaven (B) | B Site | High position above B Long near Ruins |
| Ninja | B Site | Hidden ambush near B Connector |
| Bricks | B Site | Wall connecting Palace to B Site |
| Palace | B Site | Rotation tunnel from Mid to B |
| Street | B Site | CT rotation corridor from CT Spawn |
| CT Spawn | CT Spawn | Counter-Terrorist starting area |
| Beach | CT Spawn | Open space behind CT Spawn |
| Cave | CT Spawn | Fast B rotation path |
| Tunnel (CT) | CT Spawn | Beach-to-A-site passageway |
| Sniper's Nest | CT Spawn | High AWP perch covering Gate and B Long |
Anubis A Site Callouts
A site on Anubis rewards teams who establish Heaven and Plateau control early. The bombsite revolves around a central pillar with high angles that catch attackers before they commit.
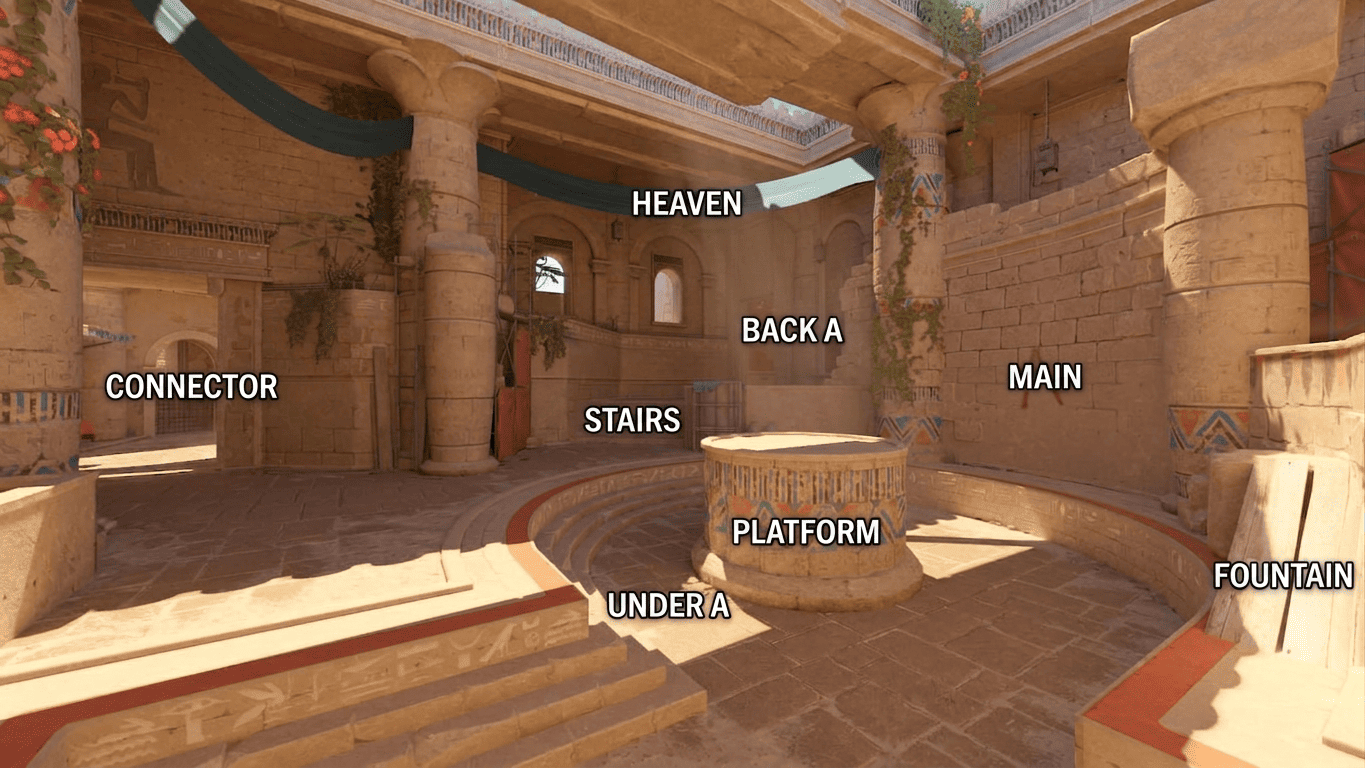
A Site
A Site is the bomb plant zone defined by a tall central pillar. Defenders post up in Heaven, Plateau, and Back Site. "Behind pillar" is the most common plant call you will hear on A.
A-Main
A-Main is the primary T-side approach corridor into A, connecting to Water and Boat. A well-placed Molotov from Heaven shuts down a dry rush.
Heaven (A)
Heaven (A) is the high position looking down on A Main. CTs play it for early picks. Always call "A Heaven" out loud, since "Heaven" alone is the single most common callout mistake in ranked CS2.
Back A Site
Back A Site is the rear area behind the plant. CTs camp here in retake setups, and Ts hold it post-plant. The shortcut "Back Site" can confuse rotations mid-round.
Plateau, Fountain, Orange, Headshot, Tunnel (A), and A Connector (A Con)
A Connector links Middle to A Site and lets T-side run splits. Lose A Con as CT and you usually lose the round.
Plateau sits between A Con and A Heaven as a transition platform. Orange marks the scaffolding next to Plateau, an easy callout to learn. Fountain is the grenade-lineup landmark on site.
Headshot is the wall on the CT side where geometry creates a headshot-only peek. Tunnel (A) is the indoor passage from CT Spawn into A Heaven. eBox is the granular cover spot near A Connector named after the electrical box that anchors the angle.
Anubis B Site Callouts
B site punishes CT passivity harder than almost any site in the current map pool. Ts hit it fast through Gate or split it with a B Connector push.
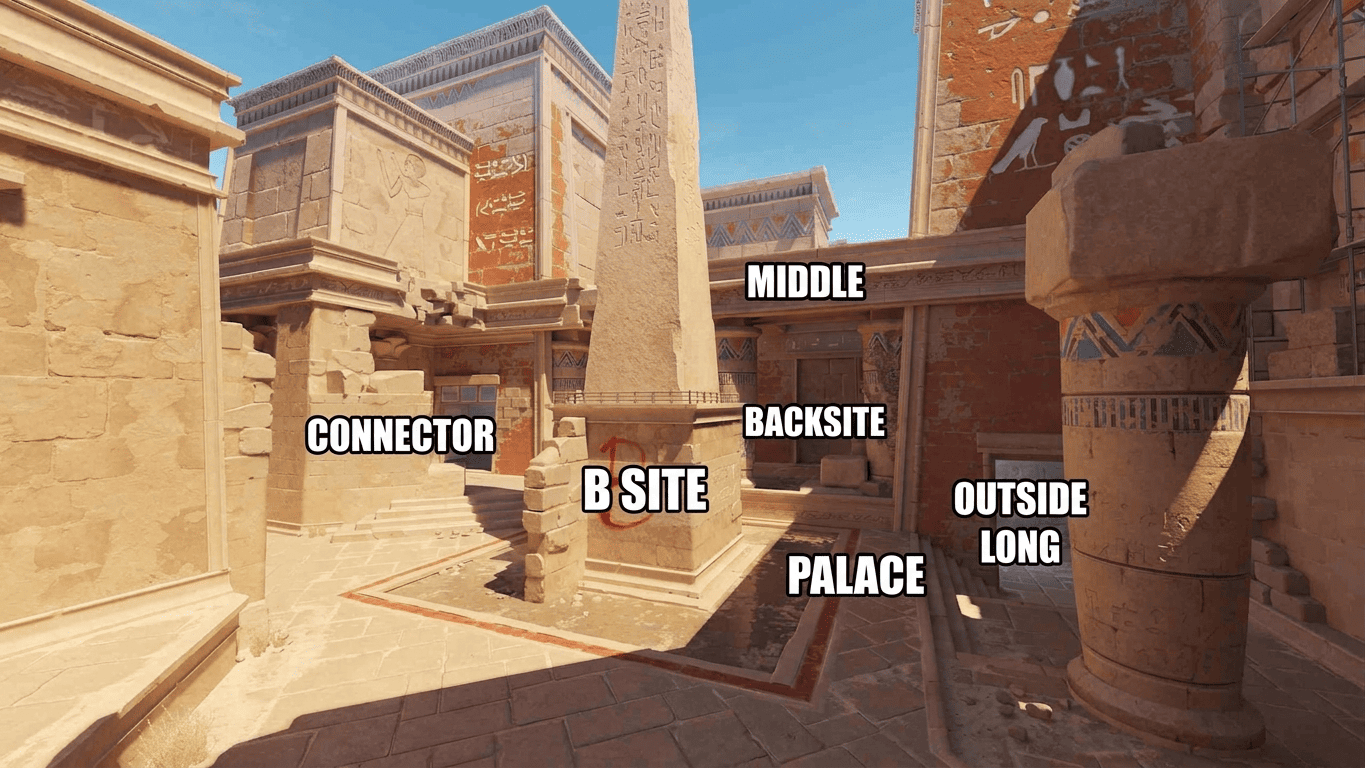
B Site, Default, Pillar, E Box, Corner, and Back Site (B)
B Site is the bomb plant zone vulnerable to fast pushes through Gate. Default is the standard plant near the central wall. Pillar is the most contested piece of geometry on the site. If T-side claims Pillar post-plant, a retake becomes exponentially harder.
E Box is a small electrical box that gives post-plant cover, and it separates players who studied Anubis thoroughly from those who didn't. Corner shows up most in retake scenarios. Back Site (B) needs the same disambiguation rule as Back A. Always specify "Back B" when you call it.
Gate, Ivy, B Long, B Connector, Heaven (B), Ninja, Bricks, Palace, and Street
Gate is the primary entry from B Long and decides a disproportionate number of CT-side losses. Ivy is the staging area where Ts stack utility before they execute.
B Long is the main T-side route, sometimes called Catwalk from CS:GO days. B Connector links Water and Bridge to B Site as a flanking option, and most teams underuse it. That is exactly why it works. Heaven (B) overlooks B Long from Ruins. Reiterate "B Heaven" every time, since the "A Heaven" versus "B Heaven" mix-up is the most common callout collision on the map.
Ninja is the hidden ambush spot near B Connector. Bricks is the cornered wall connecting Palace to B.
Palace is the rotation tunnel from Mid. A CT emerging from Palace mid-round can completely swing a B execute. Street is the CT rotation corridor from CT Spawn down to B.
Deposit your CS2 skins on PLG.bet and play Roulette or Crash, no mandatory KYC to start playing.
Anubis Mid Callouts
Mid on Anubis is where rounds are won or lost before either team reaches a bombsite. Mid control is also what analysts track when they bet on CS2: teams that consistently win mid on Anubis control the tempo of the whole match.
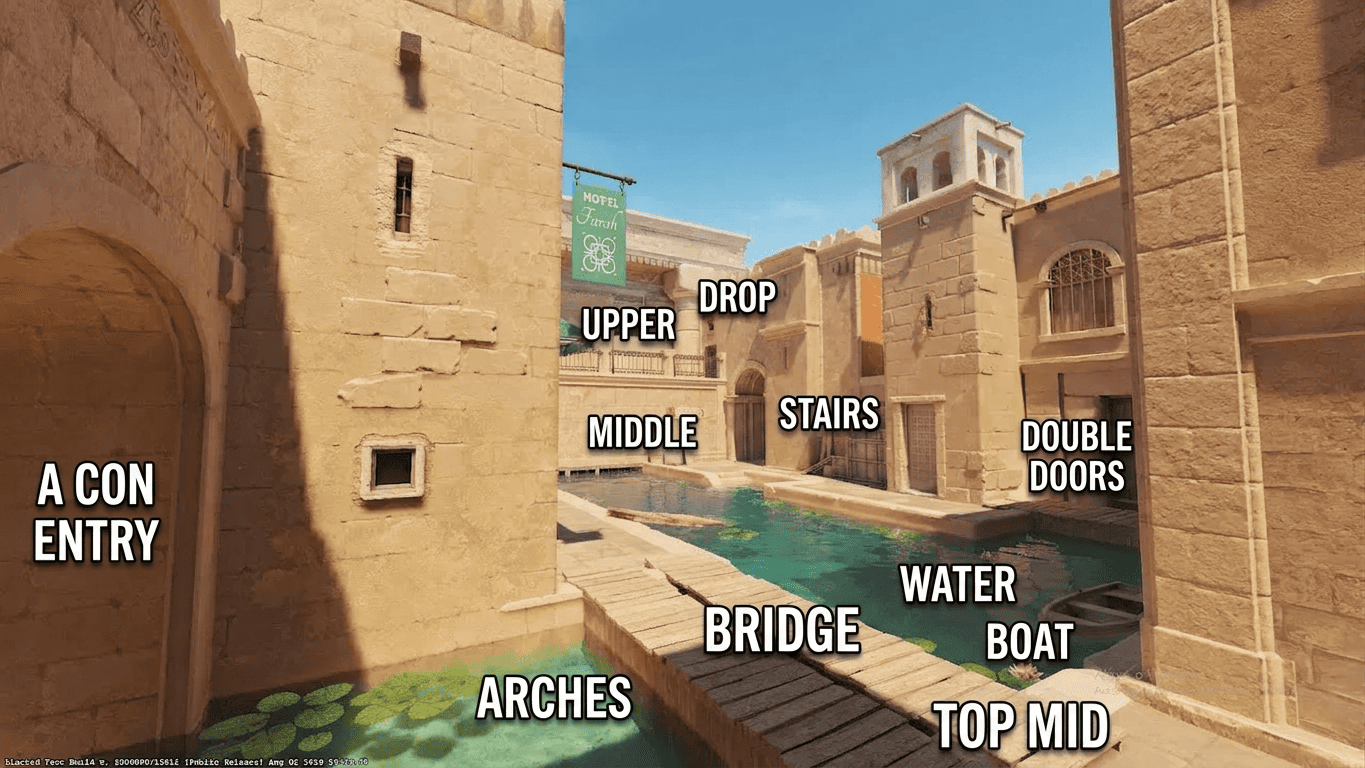
Upper, Drop, and Stairs form one continuous vertical path. Arches, Double Doors, Water, and Boat round out the central corridor.
Middle, Top Mid, and Bridge
Middle is the large central corridor connecting A, B, and CT Spawn. The team that establishes Mid presence by 30 seconds wins the information war.
Top Mid sits between Bridge and T Spawn, the first destination for Ts not running B Long. Bridge is the long pathway down to Double Doors with a drop into Water. CTs and Ts meet on Bridge in the opening seconds.
Upper, Drop, Stairs, Arches, Double Doors, Water, and Boat
Upper is the high platform above Water, reachable from Bridge. Drop is the jump-down to the water corridor. Stairs is the stepped path back to Mid. A player calling "Upper" almost always heads to Drop or Stairs next.
Arches separates the two water areas. Double Doors is the transit zone between Bridge and Middle. Water (sometimes Canal) is the lower flooded corridor and a flanking route to B Connector. Boat is the adjacent water zone carrying its CS:GO name forward, and newer players sometimes confuse Boat and Water.
Anubis T Spawn Callouts
T Spawn funnels players toward defined decision points immediately. Even "two T Spawn" tells your team that two players have not committed to a route yet.
T Spawn, Alley, Ruins, and Trash
T Spawn is the starting area and the immediate fork into A, B, or Mid. Alley is the multi-option corridor toward Water, Boat, and Top Mid. A teammate calling "Alley" signals that the team hasn't picked a site yet.
Ruins connects Top Mid to B Site access and acts as a landmark for B Heaven setups. Treat Ruins as a transit callout, not a camping position. Trash is the narrow connector between T Spawn and Ruins, useful for tracking early enemy movement.
Anubis CT Spawn Callouts
CT Spawn has multiple branching paths. Early commitment calls decide whether CTs establish map control or play reactively.
CT Spawn, Beach, Cave, Tunnel (CT), and Sniper's Nest
CT Spawn routes to A via Beach and Tunnel, to B via Street and Cave, or straight to Mid. Beach is the open area behind CT Spawn that feeds the A approach through Tunnel.
Cave is the go-to rotation path for CTs peeling from A to B, noticeably faster than rotating through Middle. CT Tunnel needs disambiguation from A Heaven Tunnel (which runs from CT Spawn up to Heaven).
Sniper's Nest is the high AWP perch covering Gate, B Long, and parts of B Site at the same time. One AWPer holding Nest can lock down an entire half of the map.
How to Use Anubis Callouts Strategically (T-Side and CT-Side)
Knowing callout names is the first step. Knowing when and why to use them wins rounds. T-side and CT-side use them differently.
T-Side Approach: Dictating the Game's Tempo
T-side on Anubis runs three main plays: a fast B execute through Gate and B Con, a Mid split into A through Bridge and A Con, and a B fake rotating into A Main.
T-side callout principles:
- Call your position before you commit to a route.
- Announce Mid presence within the first 15 seconds.
- Repeat the entity name (B Long, Gate, A Con) instead of "here".
- Confirm the strat call out loud before utility goes down.
CT-Side Approach: Map Control or You Lose
Without map control, CT-side loses on Anubis. Passive play hands Ts free Mid presence and lets them split bombsites at will.
The standard CT setup runs one A defender, two B (Sniper's Nest and Gate), one Mid or connector, and one rotator floating through Cave or Palace.
CT-side callout principles:
- Call first contact by area name immediately.
- Confirm any rotation before you leave your site.
- Specify "A Heaven" or "B Heaven" every single time.
- Trade information across the team between rounds.
Best Anubis Callout Sequences and Route Combinations
Four plays earn the first slots in any Anubis playbook for ranked CS2.
- Fast B Execute. T Spawn to Ruins to Ivy to Gate to B Site (Default). Smoke Heaven (B) and pair with a B Connector push.
- A Split via Mid. T Spawn to Top Mid to Bridge to A Connector to A Site. Two hold Bridge while three split through A Con.
- B Fake to A. T Spawn to Ivy, drop utility on Gate, then rotate through Ruins and Top Mid into A Main.
- Water Flank into B Connector. T Spawn to Alley to Stairs to Water to B Connector. An underused T-side option that catches CT defences off guard.
These sequences sharpen pattern recognition for Premier and FACEIT. Pair them with live CS2 matches on the PLG.bet sportsbook and the calls start to predict themselves.
How to Learn and Practice Anubis Callouts Effectively
Five steps take you from rough memorization to fluent in-match calls. Teams that communicate with approximate callouts still outperform teams that call nothing at all. Pick one of the steps below per session and stack them across a week.
- Study the full callout table at the top of this article as your reference baseline.
- Walk the map offline with no enemies. Say each callout out loud as you cross it.
- Play casual or deathmatch with the callout guide open on a second monitor.
- Focus on 3 to 4 key callouts per session. Start with Middle, B Long, Gate, A Main, and Sniper's Nest.
- Enter competitive play and commit to calling every position, even imperfectly.
Final Thoughts on Anubis Callouts in CS2
Anubis rewards teams with shared language as much as aim. The map sits in CS2 Active Duty for Premier and FACEIT as of 2026, where IEM Kraków and BLAST Bounty showed pros punishing every miscommunication.
Drill the strategy section and come back to the reference table when you need a refresher. The names land as muscle memory inside a few sessions.
Ready to put your CS2 reads to work? Open PLG.bet and place your first match bet alongside your casino session.