Inferno covers more than 60 named callouts in this guide, organized across five zones in CS2: A Site, B Site, Mid, CT Spawn, and T Spawn. The map sits in a fictional Italian village and has been part of Counter-Strike's bomb defusal map pool since 2001. Most of these callout names match CS:GO directly.
CS2 refined the Construction and Church naming, improved lighting around Apartments and Balcony, and closed Graveyard at A Site in the March 4, 2026 update. Every competitive round on Inferno depends on players naming positions exactly. This guide covers every one.
Why Inferno Callouts Are the Difference Between Winning and Losing
Inferno demands precise communication more than any other CS2 map. Its narrow chokepoints amplify the cost of vague callouts. "Someone's B" tells teammates nothing useful during a retake. "Two players at Car, one CT pushing Top Banana" tells them where to smoke and which angle to clear.
Both Bombsite A and Bombsite B hold more sub-positions than any other Active Duty map. A player at Pit faces different counters than a player at Dosia. Utility decisions follow callout precision.
A molotov on Coffins solves nothing when the actual threat sits in Dark. When callouts collapse on Inferno, four failures follow:
- CTs rotate to the wrong site and arrive a full second late.
- Utility lands at the wrong position and yields zero map control.
- A lurker through Underpass or Boiler walks unchecked into the retake.
- The execute breaks because the entry fragger has no support call.
Whether you're climbing competitive ranks or looking to CS2 betting sites to back your read on team performance, Inferno callout fluency is where every informed decision begins.
How Inferno Has Changed in CS2 (And What It Means for Callouts)
Most CS2 callouts on Inferno carry directly over from Counter-Strike: Global Offensive. The bulk of names stayed identical through the engine transition. Valve's Source 2 rebuild refreshed lighting, textures, and minor geometry, yet the callout system survived intact.
Three changes deserve attention. In CS2 the building outside B Site is finished, and many players have shifted to "Church" for it. "Construction" remains a common legacy callout from CS:GO, and the radar labels the spot Ruins. Valve also improved lighting across the map, easing identification in previously dark corners.
A March 4, 2026 update reshaped A Site: Graveyard was closed to the public, Apartments balcony was extended around the corner, and clipping at the small window beside Second Mid Balcony was tweaked. These changes simplify CT retakes and shift T post-plant options away from Graveyard.
One legacy callout deserves a flag: Car. The position now consists of barrels and plywood at the top of Banana, but the community kept the original name. A player hearing "Car" should know no actual car sits there.
|
Callout |
CS:GO Usage |
CS2 Status |
|
Construction / Church |
Both names used inconsistently |
Building finished; "Church" returns; radar reads "Ruins" |
|
Map lighting |
Dark corners caused misidentification |
Improved across the map, including Apartments and Balcony |
|
Graveyard (A Site) |
Active post-plant and defensive position |
Closed to the public in the March 4, 2026 update |
|
Apartments balcony (A) |
Original size |
Extended around the corner in the March 4, 2026 update |
|
Car |
Refers to a removed prop |
Same callout, no actual car (barrels and plywood) |
|
Coffins |
Coffin-shaped structures near B entry |
Same callout, structures still visible |
|
Logs |
Logs visible in Banana cubby |
Same callout, logs still visible |
The Complete CS2 Inferno Callouts Map — Visual Overview
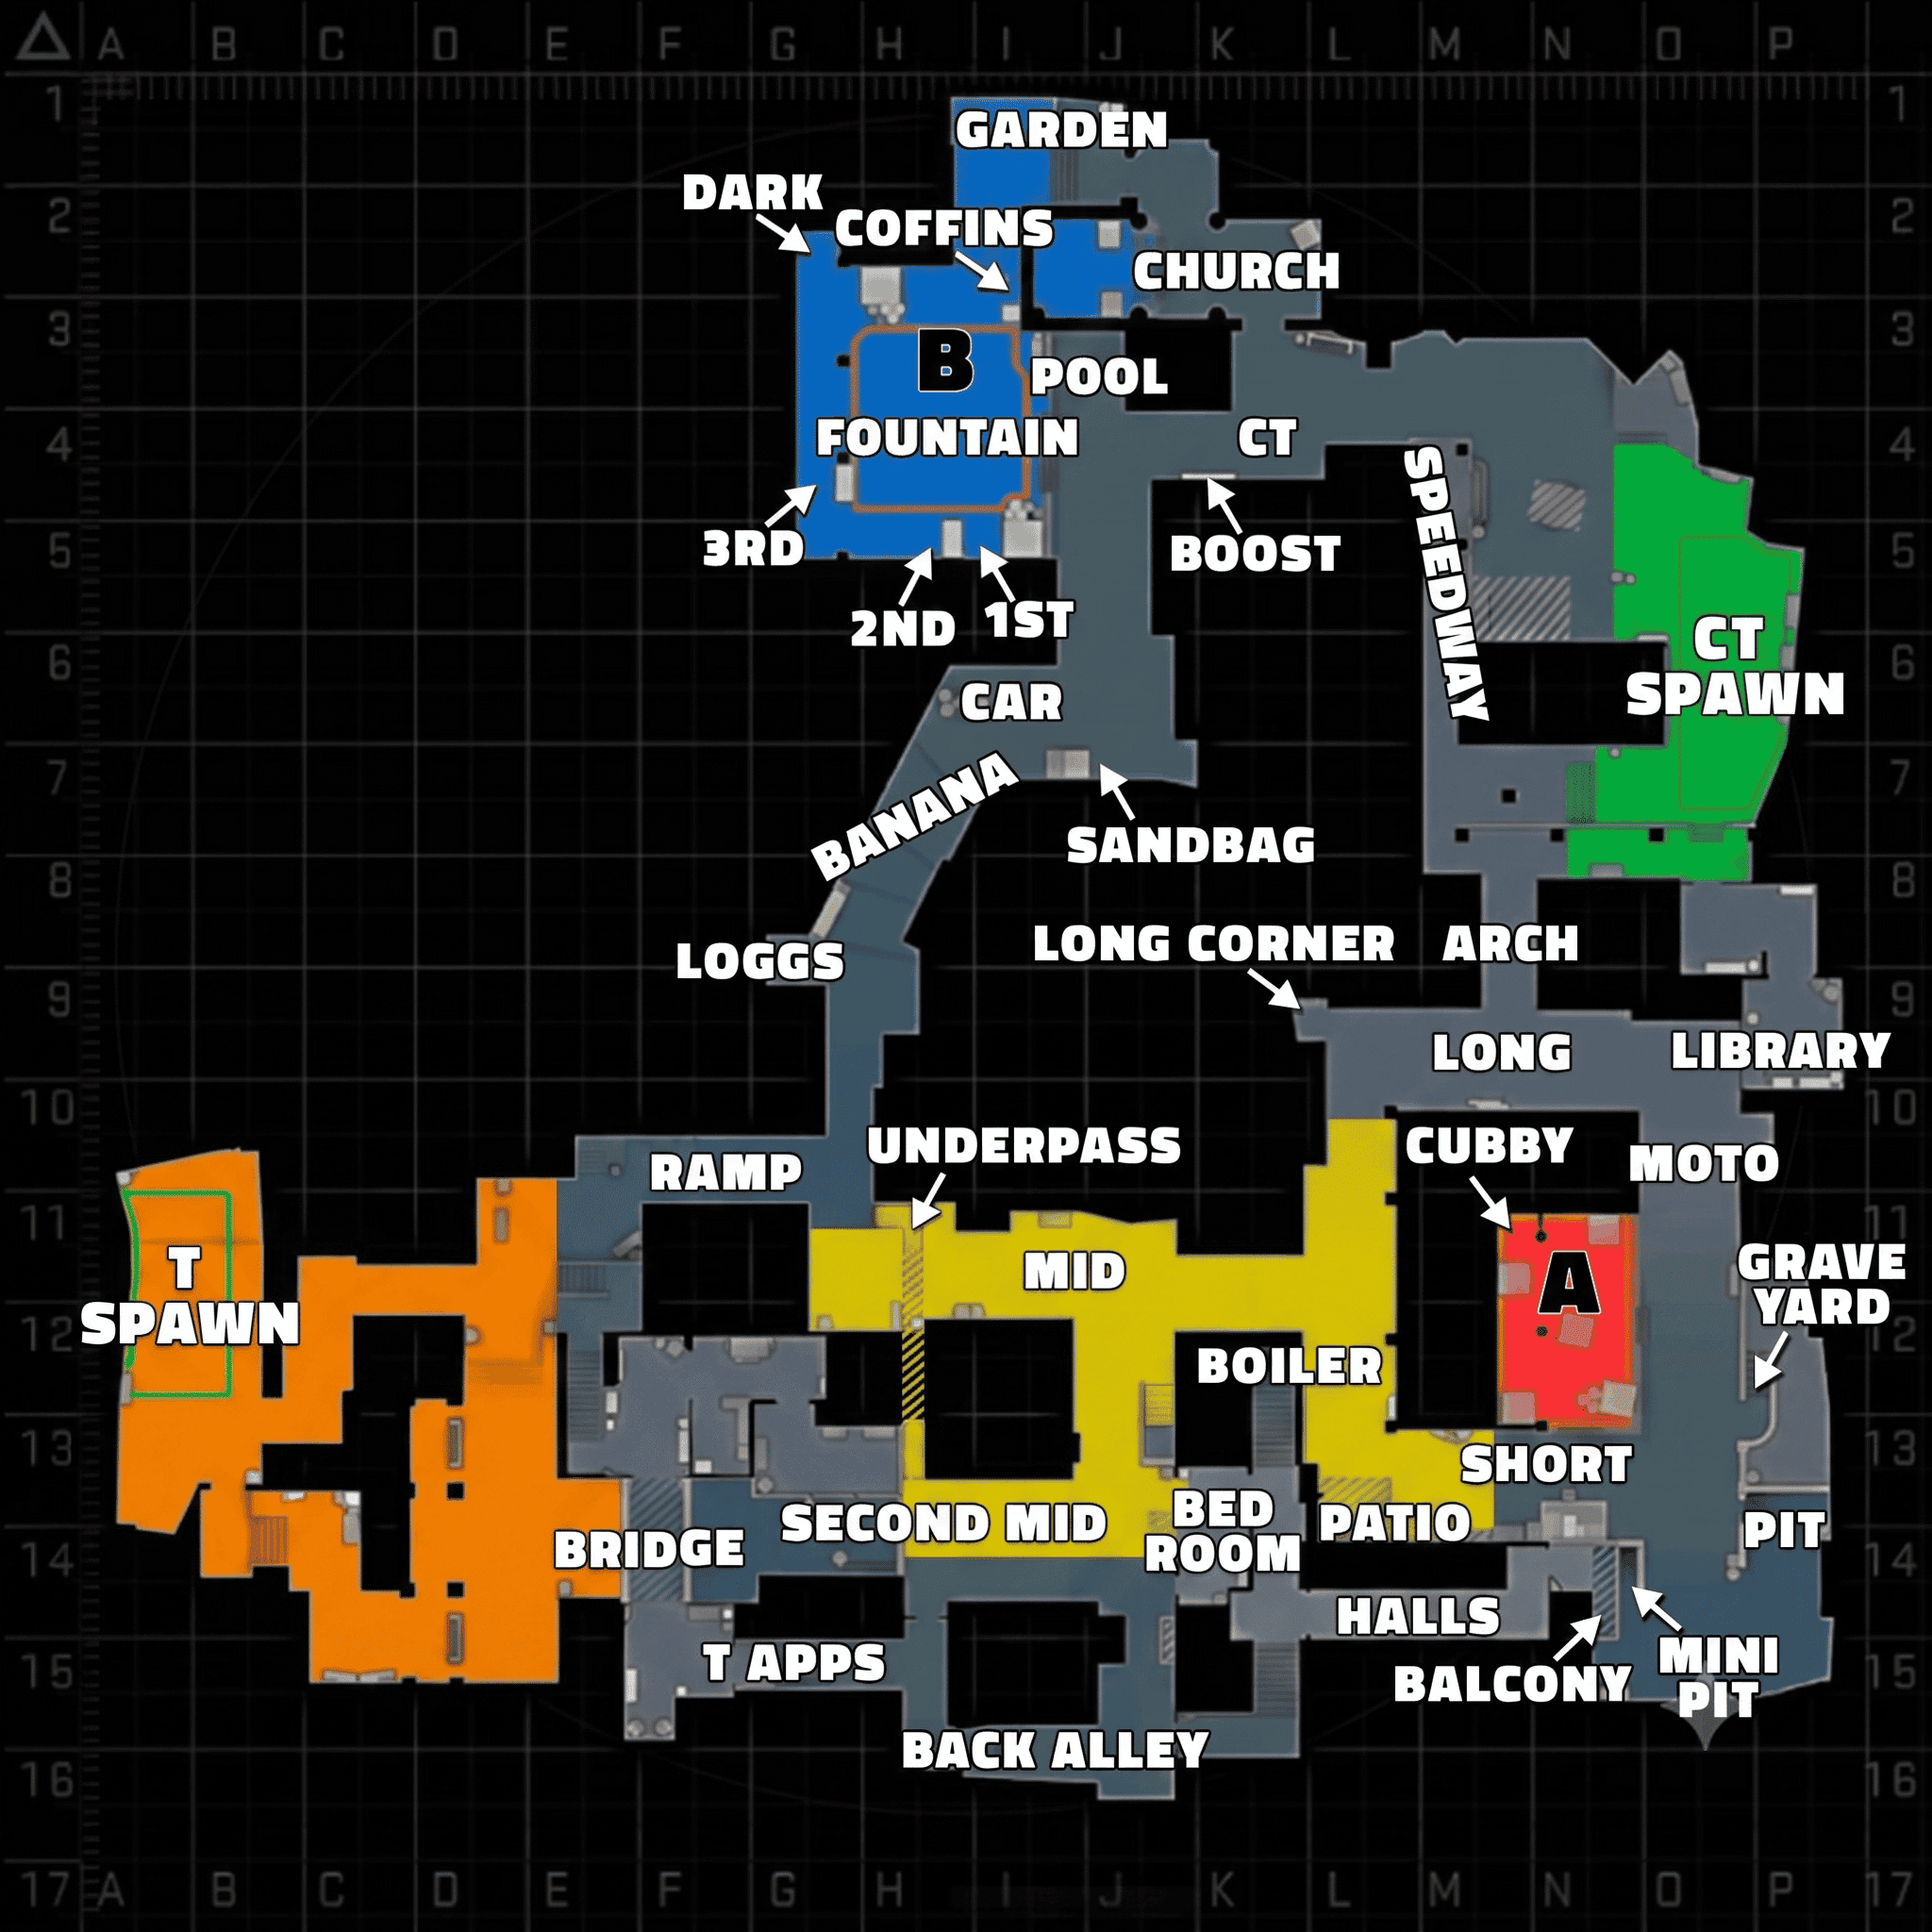
Inferno splits cleanly into five zones. A Site sits in the southeastern quadrant. B Site sits in the northeast.
Mid stretches diagonally between T Spawn and CT Spawn. CT Spawn holds the western edge. T Spawn anchors the southwest.
Five connected zones replace one large map, and that mental shift sharpens communication overnight. The annotated overhead map below color-codes each zone for reference while reading the sections that follow.
Inferno A Site Callouts — Full Breakdown
A Site holds Inferno's higher skill ceiling. It carries more entry routes, more hiding spots, and more sub-callouts than B Site. Pit, Cemetery, and Graveyard sit within meters of each other, so the wrong name collapses an entire retake. Precision here decides ranked rounds.
A Long Callouts — Library, Kitchen, Arch, Long Corner, and Arch Side
A Long runs from CT Spawn through Arch, past Library and Kitchen, into the A Site bomb zone. Arch covers the archway connecting CT Spawn to A Long. Step out of Arch and you face Arch Side, the corner in front of Library.
Inside the wine cellar, two callouts split the space: Library closest to A Site, Kitchen closer to CT Spawn. Long Corner sits at the final bend before site entry. It demands a pre-aimed molotov before any T-side commit.
A Short Callouts — Truck, Patio, Boiler, and the CT Apartments Entry
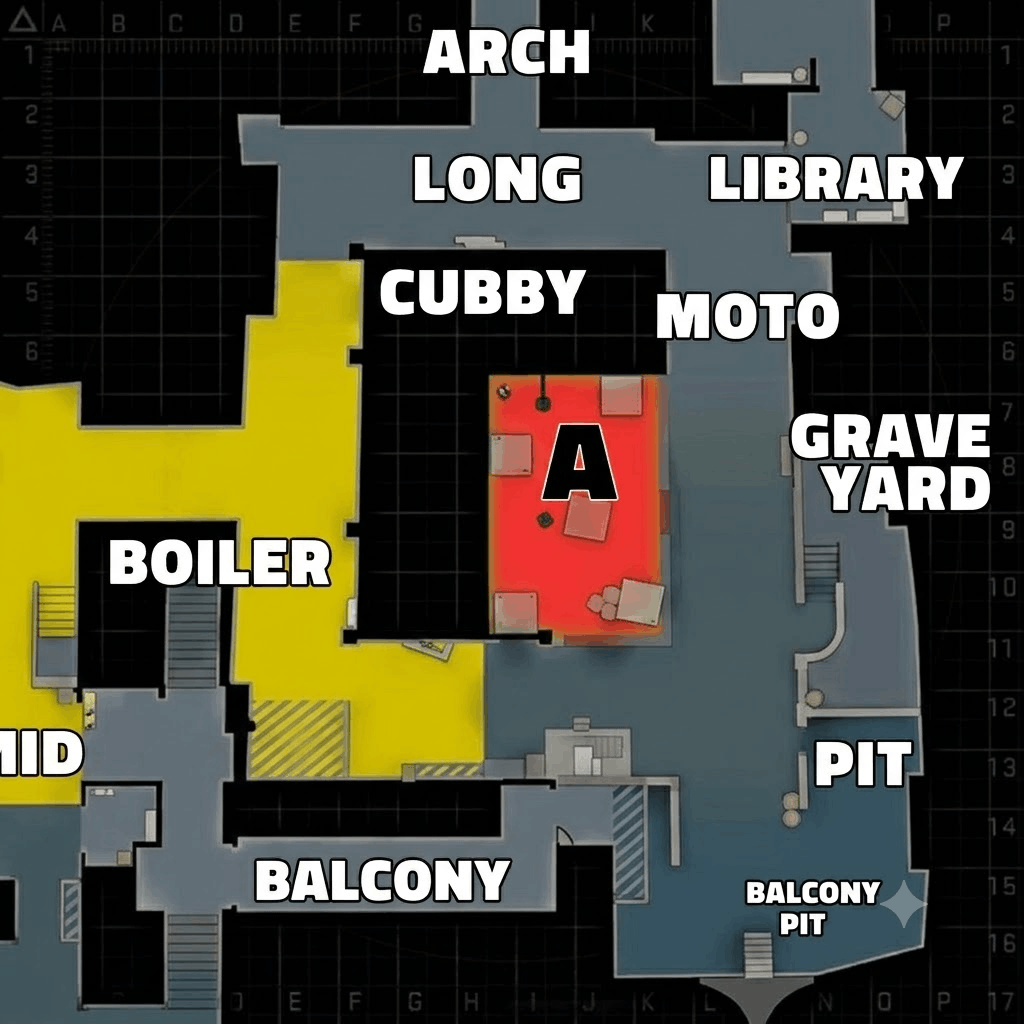
A Short connects Top Mid to A Site through Patio, Truck, and the Boiler doorway. Directly in front of the Top Mid approach sits Porch. Patio covers the corner with simultaneous vision of Truck, A Long, and Top Mid.
Strong CT holds happen at Patio. Under the Close Apartments balcony, you find Truck, the platform used as a post-plant landmark. Boiler marks the second CT Apps entrance off A Short. T-side teams need a coordinated flash to contest Patio.
On the A Site — Back Site, Close Left, Graveyard, Cemetery, Pit, Balcony, and Dosia
The A Site bomb zone holds seven named positions. Back Site marks the far right approach from A Long. Close Left names the box immediately left of A Short's site entry. Graveyard sat next to Cemetery as an elevated platform, but Valve closed it to the public in the March 4, 2026 update. The callout still appears in older guides and demos.
Cemetery covers the stone wall at the back of Pit. Above Pit from CT Apps sits Balcony, the elevated ledge. Pit itself drops into the lowered area below Balcony and holds the strongest CT defensive position on the map.
Dosia marks the deepest back-right corner of Pit. The name commemorates Dosia's HE grenade toss into this corner at PGL Major Kraków 2017. Always flash Dosia before peeking.
CT Apartments — Close Apartments, Window, Second Mid Stairs, Stairs, and Back Alley
CT Apartments connects A Site, Mid, and Second Mid. The final hallway before Balcony carries the Close Apartments callout. Window marks the large opening in CT Apps with full vision of Second Mid.
A Window hold without smoke support kills defenders before they can trade. Directly beneath Window sit the Second Mid Stairs. Stairs links Back Alley to the CT Apps entrance. Back Alley closes out T Apartments before Stairs. Smoke Window or respect it.
Inferno B Site Callouts — Full Breakdown
B Site rewards rehearsed utility and punishes improvisation. Banana ranks among the most contested corridors in all of Counter-Strike. A B hold without a smoke on CT comes down to a coin flip. The breakdown below defines every callout from Banana entry through the CT-side approach.
Banana Callouts — Logs, Car, Sand Bags, and the Approach from T Spawn
Banana curves from T Spawn to B Site. T Ramp leads from T Spawn into Banana. The small cover near Banana's entrance carries the Logs callout, an ambush spot for aggressive CT pushes.
Car covers the barrels and plywood at the top of Banana. It ranks among the most-called positions in any Inferno match. Toward the right of Banana's exit you find Sand Bags, a sandbag cover. CT players molotov this spot on nearly every round.
Two positional callouts split Banana lengthwise: Top Banana near B Site, Bottom Banana near T Spawn. CTs push Banana to deny map control. Ts smoke and molotov through to neutralize it.
On the B Site — Fountain, Dark, Coffins, 1st, 2nd, Quad, Boost, and Grill
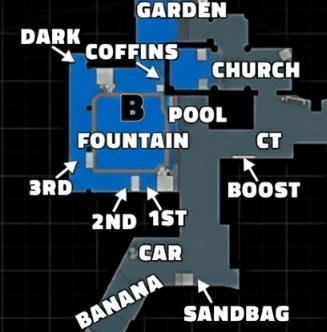
The B Site bomb zone holds eight named positions plus Porch at the front edge. At the center of B Site, the Fountain water feature anchors most plants. The shadowy back corner opposite 1st and 2nd goes by Dark. Coffins names the back-of-site scaffolding at headshot level, the highest-impact defensive position on B.
Past Banana's exit sits Porch, the front edge of B Site adjacent to 1st. The cubby between boxes left of the entry from Banana carries the 1st callout. Next to Quad sits 2nd, the second cubby. Quad names the box stack at the back of B Site.
Above 1st, Boost gives a teammate Banana vision. Grill stands just outside the bomb zone. CT names the exposed area near CT Spawn that defenders rely on during retakes. Every B execute starts with a molotov on Coffins.
Construction, Tree, Garden, CT, and CT Boost — The CT-Side B Approach
Construction marks the structure just outside B Site, called Church in older CS:GO communication and increasingly used again in CS2 now that the building looks finished. The radar labels the area Ruins. Opposite Construction's exit, a sneaky CT corner carries the Tree callout.
Just past Construction toward B sits Garden, the small green area. CT names the exposed area near CT Spawn that demands a smoke on every B execute. CT Boost sits above CT and sees over standard CT smokes. A team that pushes into the CT and CT Boost crossfire without smoking CT first loses the round.
Inferno Mid Callouts — The Most Complex Zone on the Map
Mid holds Inferno's most strategically layered ground. T Ramp, Ledge, Top Mid, Bench, Second Mid, and Underpass each carry a different tactical meaning. Most players collapse all of them into "Mid" and lose information value. Sub-callout precision here marks the largest under-used edge at every rank below the top.
T Ramp, Ledge, and Bottom Mid — The T-Side Entry Points
T Ramp names the curved stairs on the leftmost path from T Spawn into Mid. AWP duels open here in the first 10 seconds of nearly every round. Ledge sits as the small raised platform behind T Ramp, an alternative observation spot. Bottom Mid covers the side of Mid closest to T Spawn, where Underpass exits.
Main Mid, Top Mid, and Bench — The Contested Center
Mid covers the large open central area to the right of T Ramp exit. The far section where CTs defend the chokepoint carries the Top Mid callout. It supports A Short crossfires and delays Mid splits.
Bench marks the corner within Mid directly opposite the Second Mid crossover. Players use Bench as a precise utility target. The callout sounds obvious only after you learn it.
The Apartment Complex — Living Room, Balcony, Bridge, T Apartments, Second Mid, and Second Mid Door
The T-side apartment complex routes from Living Room through Bridge and T Apartments into Second Mid. Living Room names the upstairs area near T Ramp's entrance. Balcony marks the outdoor platform with vision into Window.
Bridge crosses toward CT Apps Window, a key engagement point. T Apartments sits at the end of Bridge. Second Mid covers the smaller section running between T Apartments and Window. The door connecting T Apartments to Second Mid carries the Second Mid Door callout. The full route opens one of Inferno's strongest A splits.
Underpass — Inferno's Hidden Connector
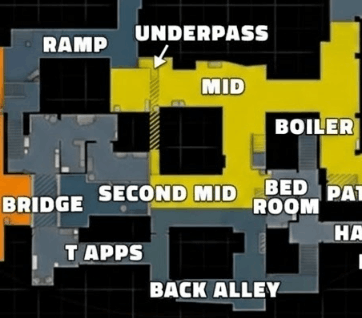
Underpass tunnels under Mid and connects it to Second Mid. Players crouch through parts of the route. T players who run Underpass pop into Second Mid unexpectedly. CTs holding Window or Stairs often miss the rotation.
CTs who push through Underpass surprise Bottom Mid. Teams react to "Underpass" completely differently than they react to "Mid".
CT Spawn and Rotational Callouts — Inferno's Overlooked Strategic Layer
The CT Spawn corridor stays under-documented in most callout guides. Speedway, Terrace, and Well form the rotation communication chain. Together they decide whether CTs arrive at a contested site on time. These callouts work as progress markers, not just locations.
CT Spawn, Terrace, and Well — The Counter-Terrorist Home Base
CT Spawn marks where the CT team starts each round. Use it to flag a teammate who has not yet committed. Terrace sits on the elevated flowery area connecting Arch entrance, Speedway, and CT Spawn. It overlooks Well and Speedway.
Well names the landmark near CT Spawn along the route to B. A Well call tells the team a rotation runs in progress.
Speedway, Arch, Arch Side, Library, and Kitchen — The Rotation Highway
Speedway stretches from Arch toward B Site, alongside Construction. It cuts the fastest CT rotation route to B. Arch covers the passageway from CT Spawn to A Site, connecting toward Speedway.
Just past Arch's exit sits Arch Side, the corner in front of Library. Library names the wine cellar closest to A Site. The same wine cellar's CT-side section goes by Kitchen. Players who treat Speedway, Arch, and Arch Side as three separate callouts clean up CT communication immediately.
T Spawn Callouts — Where Every Round Begins for the Terrorist Team
T Spawn marks the Terrorist starting position and the origin point for every round's strategic decision. The T Spawn call sets round direction: banana rush, mid take, or A split. Teams that make this call explicitly out of T Spawn win more pistols on Inferno.
T Spawn also works as a passive player-count reference. "All five at T Spawn" means the round runs as a save.
Inferno Callout Quick-Reference Table
The table below covers every Inferno callout in one reference asset. Save it for between-round review or pre-queue preparation. Active recall from a written sheet during early practice builds retention faster than passive reading.
| Zone | Callout | Location Description | Strategic Note |
| A Site | A Site | Bomb plant zone on A | Default plant area |
| A Site | Back Site | Far right of A Site approaching from A Long | Common post-plant cubby |
| A Site | Close Left | Box immediately left of A Short entry | Sneaky T-side hide |
| A Site | Pit | Lowered area below Balcony | Strongest CT defensive position on the map |
| A Site | Dosia | Deepest back-right corner of Pit | Always flash before peeking |
| A Site | Cemetery | Stone wall at the back of Pit | Common CT hold facing CT Apps |
| A Site | Graveyard | Elevated platform next to Cemetery (closed March 2026) | Legacy callout; no longer accessible |
| A Site | Balcony | Elevated ledge above Pit from CT Apps | Watch for Window peeks behind |
| A Long | A Long | Full corridor from CT Spawn to A Site | Primary T-side path to A |
| A Long | Arch | Archway from CT Spawn into A Long | CT entry to A Long |
| A Long | Arch Side | Corner immediately after exiting Arch in front of Library | Narrows enemy or teammate position |
| A Long | Library | Wine cellar section closest to A Site | Strong AWP angle onto A Long |
| A Long | Kitchen | Wine cellar section closer to CT Spawn | Utility staging point |
| A Long | Long Corner | Bend before A Site entry | Pre-aimed molotov target on T-side commit |
| A Short | A Short | Pathway from Top Mid to A Site | Secondary T entry route |
| A Short | Porch | Area directly in front of Top Mid approach | Quick contest spot |
| A Short | Patio | Covered corner with vision of Truck, A Long, and Top Mid | Aggressive CT hold; T-side needs a flash |
| A Short | Truck | Platform under Close Apartments balcony | Post-plant landmark |
| A Short | Boiler | Second CT Apps entrance off A Short | Connects A Short to CT Apps |
| CT Apps | CT Apartments | Apartment hub between A Site and Mid | Main CT corridor for A-to-Mid control |
| CT Apps | Close Apartments | Final hallway before Balcony | Trade-fragger spot |
| CT Apps | Window | Large opening with vision into Second Mid | High risk and high reward; smoke or respect it |
| CT Apps | Second Mid Stairs | Stairs directly beneath Window | Common boost spot |
| CT Apps | Stairs | Link between Back Alley and CT Apps entrance | T-side flank route |
| CT Apps | Back Alley | Final section of T Apartments before Stairs | Quiet lurk path |
| B Site | B Site | Bomb plant zone on B | Default plant area |
| B Site | Porch | Front edge of B Site adjacent to 1st | First contact spot from Banana exit |
| B Site | Fountain | Central water feature | Primary plant landmark |
| B Site | Dark | Shadowy back corner opposite 1st and 2nd | Always clear on retakes |
| B Site | Coffins | Back-of-site scaffolding at headshot level | Highest-impact CT defensive position on B |
| B Site | 1st | Cubby between boxes left of entry from Banana | First CT trade spot |
| B Site | 2nd | Cubby beside Quad | Second CT trade spot |
| B Site | Quad | Box stack at the back of B Site | Common post-plant hold |
| B Site | Boost | Elevated spot next to 1st | Boosted CT vision into Banana |
| B Site | Grill | Structure just outside the bomb zone | Plant orientation reference |
| Banana | Banana | Curved corridor from T Spawn to B Site | One of the most contested corridors on Inferno |
| Banana | Top Banana | Section closer to B Site | Late-execute reference |
| Banana | Bottom Banana | Section closer to T Spawn | Early-round contest zone |
| Banana | T Ramp (Banana) | Ramp from T Spawn into Banana | First T-side checkpoint |
| Banana | Logs | Small cover near Banana's entrance | Ambush spot for aggressive CT pushes |
| Banana | Car | Barrels and plywood at the top of Banana | Among the most-called positions in any Inferno match |
| Banana | Sand Bags | Sandbag cover toward the right of Banana's exit | Molotov target on nearly every round |
| CT Side B | Construction | Ruined structure outside B Site | Building finished in CS2; "Church" returns; radar reads "Ruins" |
| CT Side B | Tree | Dark corner opposite Construction's exit | Sneaky CT hold |
| CT Side B | Garden | Small green area outside Construction toward B | Late-round flank spot |
| CT Side B | CT | Exposed area near CT Spawn outside B | Mandatory smoke on every B execute |
| CT Side B | CT Boost | Elevated position above CT | Sees over standard CT smokes |
| Mid | Mid | Large open central area to the right of T Ramp exit | Broad zone reference |
| Mid | Top Mid | Far Mid section where CTs hold the chokepoint | Supports A Short crossfires |
| Mid | Bench | Corner within Mid opposite Second Mid crossover | Precise utility target |
| Mid | T Ramp (Mid) | Curved stairs on leftmost path from T Spawn into Mid | Site of opening AWP duels |
| Mid | Ledge | Small raised platform behind T Ramp | Alternative observation spot |
| Mid | Bottom Mid | Side of Mid closest to T Spawn | Underpass exit point |
| Apts (Mid) | Living Room | Upstairs area near T Ramp's entrance | Apartment complex entry |
| Apts (Mid) | Balcony (Mid) | Outdoor platform with vision into Window and Second Mid | T-side spot for early info |
| Apts (Mid) | Bridge | Crossing facing CT Apps Window | Key Mid engagement |
| Apts (Mid) | T Apartments | Area at the end of Bridge | A-split staging point |
| Apts (Mid) | Second Mid | Smaller section between T Apartments and Window | Connects to Underpass |
| Apts (Mid) | Second Mid Door | Door from T Apartments into Second Mid | Split execute entry |
| Apts (Mid) | Underpass | Underground tunnel between Mid and Second Mid | Players crouch through parts of it |
| CT Area | CT Spawn | CT team starting position | Used to mark a teammate not yet committed |
| CT Area | Terrace | Elevated flowery area at Arch entrance | Overlooks Well and Speedway |
| CT Area | Well | Landmark near CT Spawn along the route to B | Rotation progress reference |
| CT Area | Speedway | Long walkway from Arch toward B Site | Fastest CT rotation route to B |
| T Spawn | T Spawn | Terrorist starting position | Sets round direction call: rush, take, or split |
How to Actually Learn and Retain Inferno Callouts in CS2
Callout fluency is a method problem, not a time problem.
5-Step Method for Learning Inferno Callouts Fast:
- Start with the five highest-volume callouts: Banana, Top Mid, A Short, CT Apps, Pit.
- Walk each callout in an offline server, saying names aloud.
- Keep the Quick-Reference Table open across your first 3 live matches.
- Run the callout drill: a partner calls names, you ping locations.
- Review demos and flag rounds where a vague callout cost info.
Mastery means speaking the callout the instant you see an enemy.
Strategies for Using Inferno Callouts in Live Rounds
Three callout patterns drive most of the round-by-round impact on Inferno. Banana and Mid control combine to create cross-map pressure that splits CT rotations. A precise callout sends "Smoke CT" exactly where it has to land. "Smoke over there" lands nowhere useful.
Teams that build executes on callouts replace fragments with full tactical sentences. The clearest example: "going A Short, need smoke Patio and flash Pit."
That single sentence is only possible when every player knows the map — the same callout fluency that separates clutch retakes from wasted rounds, and sharp spectators who bet on CS2 from those guessing blind.