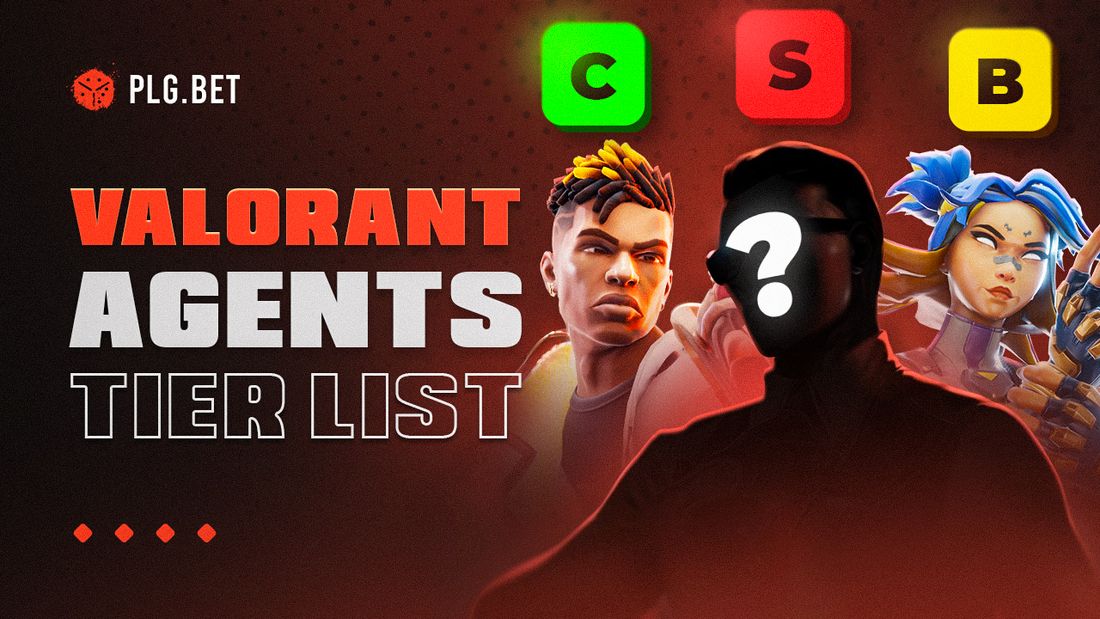
Tired of conflicting valorant tier lists flooding the internet? The confusion caused by countless rankings creates decision paralysis for players seeking reliable guidance. This comprehensive analysis combines hard data from VCT tournaments, ranked statistics across all skill brackets, and tactical insights from competitive analysis to deliver actionable strategies.
Unlike surface-level rankings that simply list agents, this complete valorant framework examines the intricate relationships between patch changes, map dynamics, and team synergies. The tier list presented here reflects real viability in competitive environments where strategic depth and perfect agent selection determine match outcomes.
Understanding Valorant Agent Tier Lists
How This Tier List Was Created
This valorant tier list methodology synthesizes multiple data sources for maximum accuracy. Professional tournament pick rates from VCT events reveal high-level meta preferences, while ranked win-rate statistics across different skill brackets show practical viability for climbing players.
The analytical process combines hard data with qualitative assessment of agent kits, examining how abilities interact with current map pools and team composition archetypes. Recent patch impact analysis ensures rankings reflect the evolving tactical landscape rather than outdated perceptions from previous seasons.
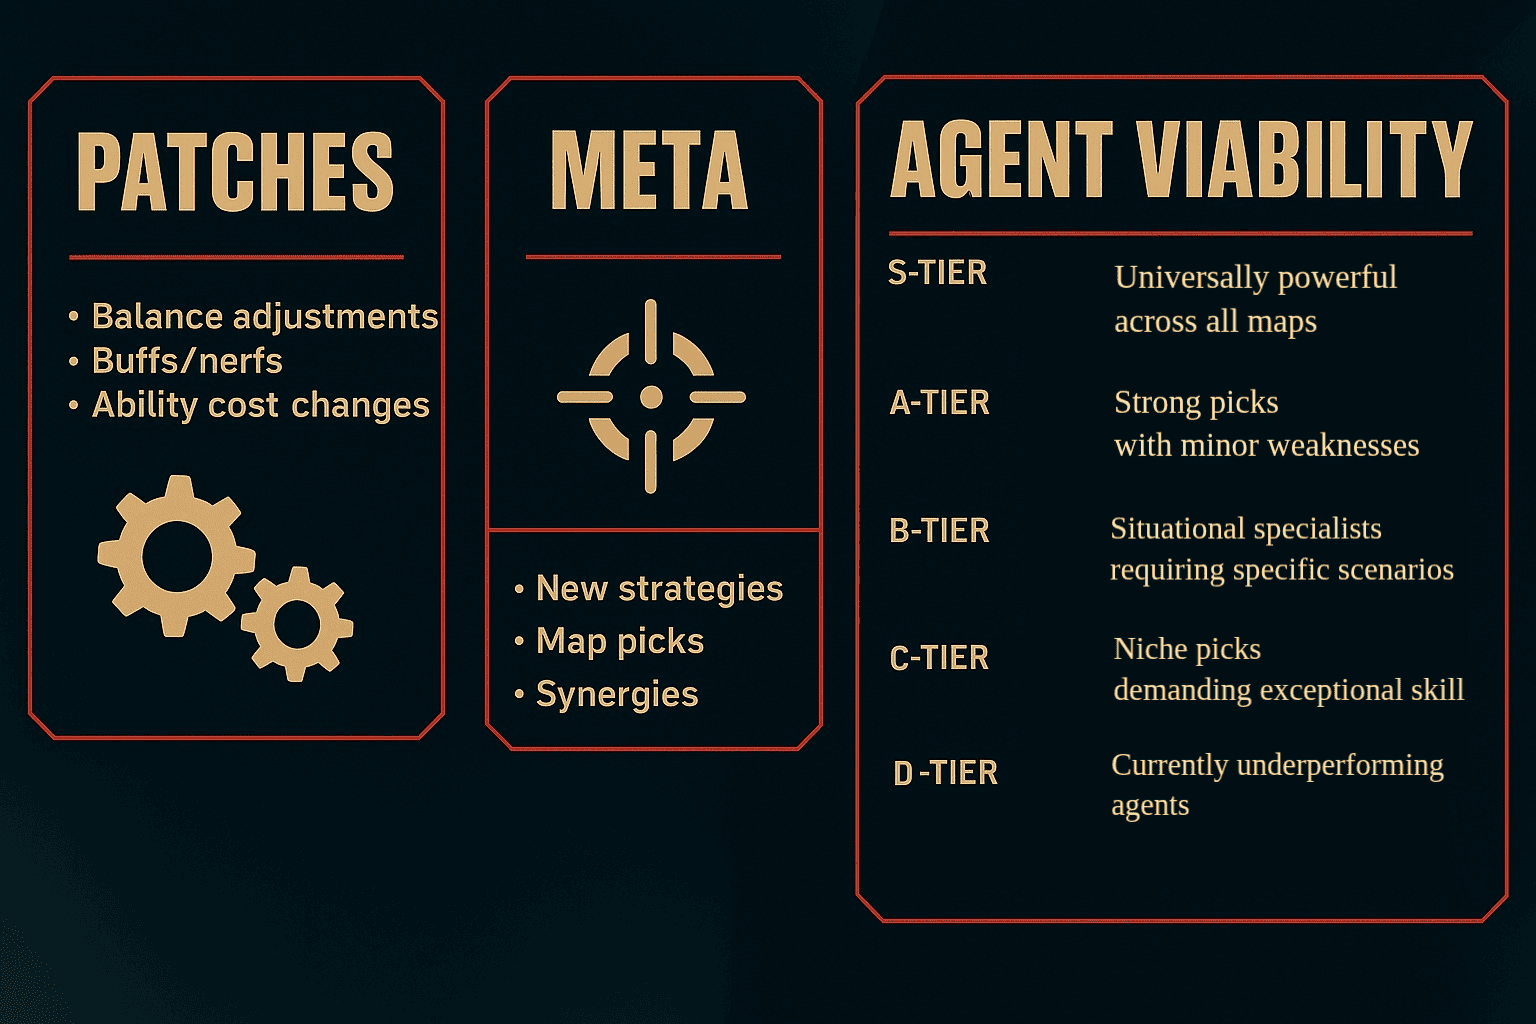
Tier System Breakdown:
- S-Tier: Universally powerful across all maps and team compositions
- A-Tier: Strong picks with minor weaknesses, viable in most situations
- B-Tier: Situational specialists requiring specific scenarios or team synergy
- C-Tier: Niche picks demanding exceptional skill or counter-pick situations
- D-Tier: Currently underperforming agents struggling against meta trends
Key Factors That Influence Agent Rankings
Agent viability fluctuates based on interconnected variables that shape the competitive landscape. Patch changes directly impact ability effectiveness through damage modifications, utility costs, and cooldown adjustments that create significant meta shifts affecting overall character rankings.
Map pool composition heavily influences agent selection patterns. Certain agents excel on specific layouts due to geometric advantages, while team synergy considerations evaluate how agents complement each other's abilities, creating multiplicative value that exceeds individual power levels in coordinated team compositions.
Complete Valorant Agents Tier List 2025
Current Meta Rankings Overview

After extensive analysis of recent competitive data and ranked performance metrics across all skill levels, this definitive valorant agent tier list reflects the current state of tactical shooter balance. Each agent placement considers versatility, impact potential, and consistency factors.
| Agent | Tier | Role | Key Strength |
| Omen | S | Controller | Rechargeable smokes and flexibility |
| Vyse | S | Sentinel | Indestructible walls and site control |
| Yoru | S | Duelist | Dimensional drift and map presence |
| Sova | S | Initiator | Superior intel gathering abilities |
| Clove | S | Controller | Post-death utility and self-revive |
| Gekko | A | Initiator | Reusable utility and wingman planting |
| Killjoy | A | Sentinel | Site lockdown and post-plant control |
| Raze | A | Duelist | Explosive damage and mobility |
| Neon | A | Duelist | Speed and slide mechanics |
| Cypher | A | Sentinel | Information network and versatility |
| Fade | A | Initiator | Fear-based vision and intel tools |
| Jett | B | Duelist | Operator synergy and high skill ceiling |
| Sage | B | Sentinel | Healing utility and wall placement |
| Tejo | B | Initiator | Crowd control and site clearing |
| Phoenix | B | Duelist | Self-sustaining abilities |
| Brimstone | C | Controller | Simple smoke utility |
| Reyna | C | Duelist | Solo queue potential, limited team utility |
| Astra | C | Controller | Complex global control abilities |
| Viper | C | Controller | Map-specific toxic utility |
| Chamber | D | Sentinel | Aim-dependent with limited team utility |
| Skye | D | Initiator | Outdated healing and flash abilities |
| Harbor | D | Controller | Inconsistent water-based utility |
S-Tier: The Meta Dominators
Omen continues to dominate as the most flexible controller through rechargeable smokes and one-way setups. His paranoia provides team fight initiation while shrouded step enables aggressive positioning. The combination of utility renewal and map presence makes him universally viable across all team compositions and skill levels.
Vyse has quickly established herself as the premier sentinel with indestructible walls that create unmatched site control. Her razorvine and arc rose abilities offer active utility management rather than static setups. Steel garden ultimate can completely neutralize enemy pushes, making her invaluable in both defensive and retake scenarios.
Yoru has risen from meme pick to meta-defining duelist thanks to professional players showcasing his potential. Dimensional drift provides safe reconnaissance and complex execution possibilities that no other agent can match. His teleport and footsteps create mind games that force enemies into constant uncertainty.
Sova remains the premier initiator through comprehensive intel-gathering capabilities. Recon bolt lineups reveal enemy positions with precision while owl drone provides real-time battlefield information. Hunter's fury ultimate controls space and secures eliminations across the entire map, making him irreplaceable.
Clove revolutionizes controller gameplay through post-death utility activation and self-revive potential. Their smoke placement flexibility and pick-me-up ability create unprecedented second-chance opportunities. The combination of aggressive potential and support capabilities makes them perfect for modern team compositions.
Key S-Tier Advantages:
- Universal effectiveness across all maps and team strategies
- High skill ceiling with immediate impact potential
- Professional tournament priority picks with consistent results
- Ability to single-handedly swing round outcomes through individual plays
A-Tier: The Reliable Performers
Gekko provides exceptional utility value through his reusable creature abilities. Wingman can plant spikes safely while dizzy offers reliable information gathering. Mosh pit creates area denial while thrash ultimate detains enemies for team follow-up. His ability recovery system makes him forgiving for developing players.
Killjoy maintains defensive excellence through comprehensive site lockdown capabilities. Turret and alarmbot combinations create early warning systems while nanoswarms control post-plant scenarios. Lockdown ultimate forces positional disadvantages, though her range restrictions limit flexibility compared to other sentinels.
Neon excels through unmatched speed and repositioning capabilities. Her slide mechanics and high gear movement confuse enemy aim while relay bolts clear common angles. Overdrive ultimate threatens multiple enemies with sustained damage, making her powerful on larger maps requiring fast rotations.
Cypher provides versatile information networks without range limitations. Trapwire and spycam combinations reveal enemy movements while cyber cages create positional advantages. Neural theft ultimate gives comprehensive enemy location data, maintaining his relevance despite recent ability adjustments.
| Agent | Primary Strength | Team Role | Current Status |
|---|---|---|---|
| Gekko | Utility recycling | Flexible initiator | Rising popularity |
| Killjoy | Site control | Defensive anchor | Consistent pick |
| Neon | Speed advantage | Entry fragger | Pro play favorite |
| Cypher | Information network | Lurker/Anchor | Reliable choice |
B-Tier: Situational Specialists
Jett remains viable for operator usage and high-skill scenarios but has stepped back from meta dominance. Dash nerfs reduced her escape reliability while other duelists offer more consistent team impact. Her ceiling remains high for mechanical specialists but requires exceptional aim to justify selection.
Sage provides healing utility and wall placement that create value in specific situations. Resurrection ability can reverse numerical disadvantages while slow orbs control enemy movement. However, limited offensive potential and easily countered utility restrict impact in aggressive team compositions.
Tejo offers crowd control and site-clearing capabilities through guided salvo and recon abilities. His utility helps break defensive setups but requires coordination to maximize effectiveness. Recent nerfs have reduced his oppressive potential, placing him in situational pick territory.
Phoenix maintains self-sufficiency through healing abilities and versatile utility. Hot hands and curveball create entry opportunities while run it back ultimate allows risk-free aggressive plays. His recent buffs have improved viability, though other duelists often provide superior team impact.
| Agent | Best Situations | Required Team Support | Skill Floor |
|---|---|---|---|
| Jett | Operator usage, high-skill lobbies | Medium | High |
| Sage | Defensive holds, healing-focused comps | Low | Low |
| Tejo | Coordinated site executes | High | Medium |
| Phoenix | Solo queue, self-reliant plays | Low | Medium |
C-Tier and D-Tier: The Underperformers
C-Tier agents struggle in the current meta but retain niche applications. Reyna excels in solo queue fragging but lacks team utility for coordinated play. Astra offers global control but requires exceptional coordination and communication. Viper has been significantly nerfed and now works only on specific maps with proper setups. Brimstone provides simple utility but lacks the flexibility of superior controllers.
D-Tier agents face significant challenges in competitive environments. Chamber relies heavily on individual aim without providing team utility, making him ineffective against coordinated opponents. Skye has fallen from grace after repeated nerfs to her flashes and healing capabilities, with other initiators offering superior value. Harbor continues to struggle with inconsistent water-based utility that fails to match other controllers' impact.
Main C/D-Tier Weaknesses:
- Limited team utility compared to meta alternatives
- High coordination requirements without sufficient reward
- Vulnerability to current meta strategies and agent combinations
- Inconsistent impact across different skill levels and map types
- Often require opponent mistakes rather than proactive value creation
Using Agent Knowledge for Valorant Esports Betting
Understanding agent strength and meta trends enhances the experience of following professional Valorant competitions. When teams prioritize s-tier agents like Omen and Vyse, their strategic approach often reflects confidence in standard meta execution rather than experimental team compositions.
Professional agent selection patterns reveal tactical preferences and team adaptation strategies. Teams consistently picking lower-tier agents either possess exceptional mastery or plan specific counter-strategies against opponent weaknesses. This knowledge provides context for tournament analysis beyond surface-level gameplay observation.
Meta understanding creates strategic layers for competitive viewing experiences. When patches shift agent viability, teams adapting quickly often gain temporary advantages over slower-adjusting opponents. These dynamics influence match outcomes in ways that pure mechanical skill cannot overcome.
Tips for Analyzing Professional Valorant Matches:
- Track agent selection timing and reasoning based on tier advantages during draft phase
- Identify comfort picks versus meta selections when teams face pressure situations
- Notice how teams exploit tier differences in mirror matchups and strategic adaptations
- Observe utility combination strategies and coordination timing in professional execution
- Analyze map-specific agent selections that deviate from standard tier rankings
Apply your tier list knowledge by following VCT tournaments and other professional competitions on plg.bet/bets, where understanding agent strength and team compositions can enhance your esports viewing experience.
Best Valorant Agents for Beginners
New players should prioritize agents with straightforward abilities and immediate impact. Sage offers healing and walls that contribute regardless of mechanical skill, while her resurrection provides game-changing moments. Clove simplifies controller mechanics through regenerating smokes and forgiving post-death utility activation.
Gekko rewards beginners through reusable abilities that forgive mistakes. Wingman can plant spikes safely while dizzy provides information gathering. The ability recovery system makes learning easier since misused utility can be reclaimed for future rounds.
Omen provides accessible controller gameplay through simple smoke placement and flexible utility usage. His abilities scale with map knowledge while offering immediate value through basic smoke coverage and occasional paranoia usage during team pushes.
Beginner-Friendly Agents:
- Sage: Simple healing and defensive utility with immediate team impact
- Clove: Forgiving controller with post-death utility opportunities
- Gekko: Reusable abilities that minimize punishment for mistakes
- Omen: Flexible controller that scales with map knowledge development
How to Unlock Agents in Valorant
Agent unlocking follows the contract system requiring activation through Collection tab before earning XP toward completion. Each agent contract costs 200,000 XP total, with agent unlock occurring at Tier 5 requiring 25,000 XP. Players can activate multiple contracts simultaneously but earn XP only toward selected contract.
Fastest XP earning methods prioritize daily and weekly mission completion over raw match grinding. Daily missions provide 2,000 XP each while weekly missions offer up to 20,000 XP bonuses. Spike Rush delivers efficient XP per time invested, especially when combined with mission completion objectives.
Unlocking Process:
- Navigate to Collection tab and select desired agent contract
- Activate contract to begin XP accumulation toward agent unlock
- Complete daily missions for maximum efficiency gains
- Play Spike Rush for quick XP with minimal time commitment
- Focus on weekly missions for substantial XP bonus opportunities
- Consider Battle Pass boosts if available during current season
Role-Based Agent Analysis
Duelist Tier Rankings
Duelists prioritize entry fragging and space creation through aggressive positioning. Yoru dominates through dimensional drift capabilities enabling safe reconnaissance and complex executes. His mind-game potential and professional success make him the premier duelist choice for coordinated gameplay.
Neon provides unmatched speed advantages through slide mechanics and high gear movement. Her relay bolts clear angles while overdrive ultimate threatens sustained damage. These capabilities make her strongest on larger maps requiring fast rotations and repositioning.
| Duelist | Tier | Primary Strength | Ideal Situations | Learning Curve |
|---|---|---|---|---|
| Yoru | S | Dimensional drift mind games | Haven, complex executes | High |
| Neon | A | Unmatched speed and slides | Large maps, fast rotations | Medium |
| Raze | A | Explosive damage and mobility | Open areas, vertical maps | Medium |
| Jett | B | Operator synergy and dash | High-skill lobbies, AWP setups | High |
| Reyna | C | Individual fragging potential | Solo queue, uncoordinated teams | Low |
| Phoenix | B | Self-sufficient healing abilities | Entry fragging, solo plays | Low |
Controller Tier Rankings
Controllers shape round flow through smoke placement and area denial. Omen leads through versatile dark cover placement and shrouded step repositioning capabilities. Paranoia provides team fight initiation while smoke renewal maintains consistent map control throughout rounds.
Clove offers revolutionary post-death utility activation and self-revive mechanics. Their smoke placement flexibility creates unprecedented second-chance opportunities while pick-me-up ability enables aggressive controller gameplay previously impossible.
Controller Strategic Uses Chart:
- Map Control: Omen (global smokes) > Clove (flexible placement) > Astra (cosmic divide) > Viper (linear walls) > Brimstone (limited range) > Harbor (inconsistent coverage)
- Post-Plant Utility: Viper (snake bite lineups) > Clove (decay mollies) > Brimstone (incendiary) > Astra (gravity well) > Omen (none) > Harbor (cascade)
- Team Fight Support: Omen (paranoia blinds) > Clove (pick-me-up healing) > Astra (nova pulse stuns) > Others (limited fight utility)
- Defensive Holds: Viper (toxic screen) > Astra (star placement) > Omen (one-ways) > Clove (ruse smokes) > Brimstone (sky smoke) > Harbor (high tide)
Initiator Tier Rankings
Initiators gather intel and create opportunities through reconnaissance abilities. Sova dominates through comprehensive information gathering via recon bolt and owl drone combinations. Hunter's fury ultimate provides area control forcing enemy repositioning or elimination.
Gekko specializes in utility recycling through creature-based abilities. Wingman enables safe spike plants while dizzy provides information gathering. His ability recovery system creates forgiving gameplay for developing tactical understanding.
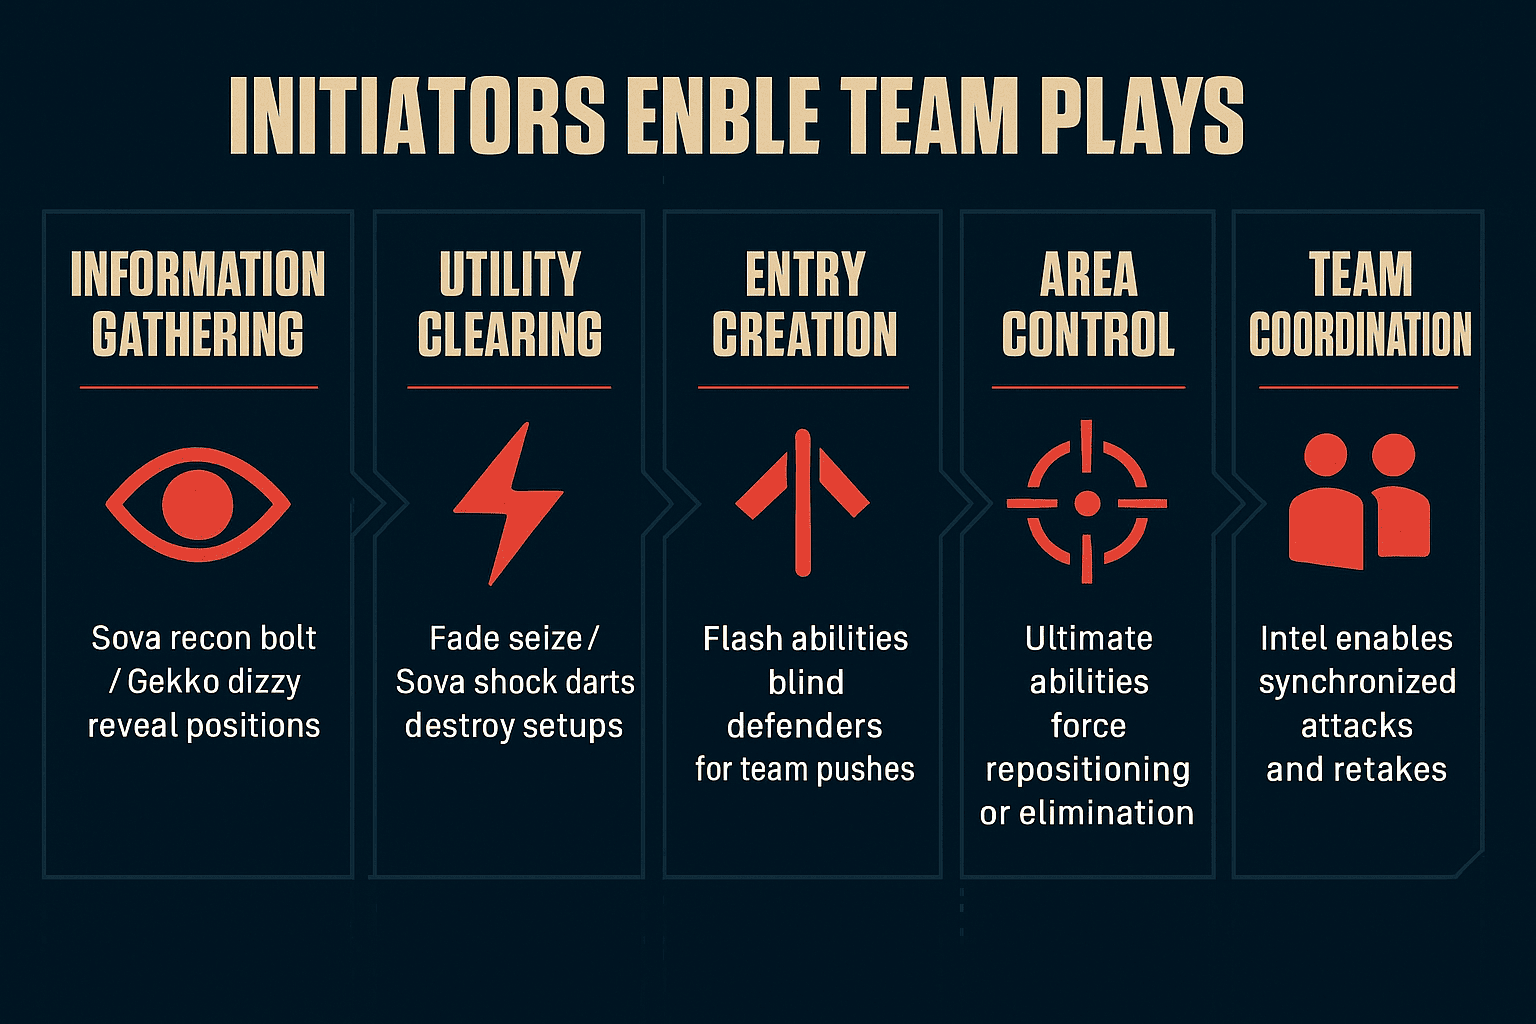
How Initiators Enable Team Plays:
- Information Gathering → Sova recon bolt/Gekko dizzy reveal positions
- Utility Clearing → Fade seize/Sova shock darts destroy setups
- Entry Creation → Flash abilities blind defenders for team pushes
- Area Control → Ultimate abilities force repositioning or elimination
- Team Coordination → Intel enables synchronized attacks and retakes
Sentinel Tier Rankings
Sentinels anchor defensive positions through utility and information networks. Vyse excels through indestructible wall control and active utility management. Her steel garden ultimate completely neutralizes enemy pushes while razorvine creates area denial.
Killjoy provides comprehensive site lockdown using turret, alarmbot, and nanoswarm combinations. Lockdown ultimate forces positional disadvantages though range restrictions limit flexibility compared to other sentinel options available.
Sentinel Map Setup Guide:
- Ascent A-Site: Killjoy turret (heaven), alarmbot (generator) / Cypher camera (back site), tripwire (main)
- Ascent B-Site: Cypher camera (back site), tripwire (market entrance) / Sage wall (market rotation)
- Bind A-Site: Vyse wall (lamps control), razorvine (truck) / Sage wall (bath rotation)
- Bind B-Site: Killjoy turret (site), nanoswarm (elbow) / Cypher tripwire (long)
- Haven C-Site: Cypher camera (connector), tripwire (long) / Deadlock sonic sensor (garage)
- Split B-Site: Cypher camera (heaven), tripwire (ramps) / Killjoy turret (default), alarmbot (heaven)
Strategic Agent Selection Guide
Map-Specific Agent Choices
Map geometry influences agent effectiveness beyond standard tier rankings. Ascent favors agents with vertical control like Yoru and Neon due to elevated positions and rotation requirements. Omen smoke placement becomes crucial for controlling mid rotations effectively.
Bind rewards close-quarters specialists while Haven's three-site layout demands flexible utility usage. Vyse walls provide exceptional value where enemies cannot easily bypass defensive positions established.
| Map | Primary Agents | Secondary Options | Strategic Focus |
|---|---|---|---|
| Ascent | Omen, Killjoy, Sova | Jett, Raze, Cypher | Mid control, heaven positions |
| Bind | Raze, Gekko, Vyse | Omen, Sage, Fade | Teleporter control, close angles |
| Haven | Yoru, Clove, Fade | Omen, Cypher, Neon | Three-site coverage, rotations |
| Split | Omen, Cypher, Neon | Sage, Raze, Sova | Ramp control, vertical positioning |
| Fracture | Neon, Vyse, Breach | Killjoy, Yoru, Clove | Zip line control, site isolation |
Team Composition Synergies
Effective compositions maximize agent synergies while covering strategic weaknesses. Rush compositions combine Gekko initiation with Neon speed for fast site execution. These lineups prioritize tempo over methodical control strategies requiring extensive setup.
Default compositions balance roles through Omen smoke control, Sova information gathering, and Vyse site anchoring. This archetype provides flexibility for both aggressive plays and defensive holds depending on round requirements and team positioning needs.
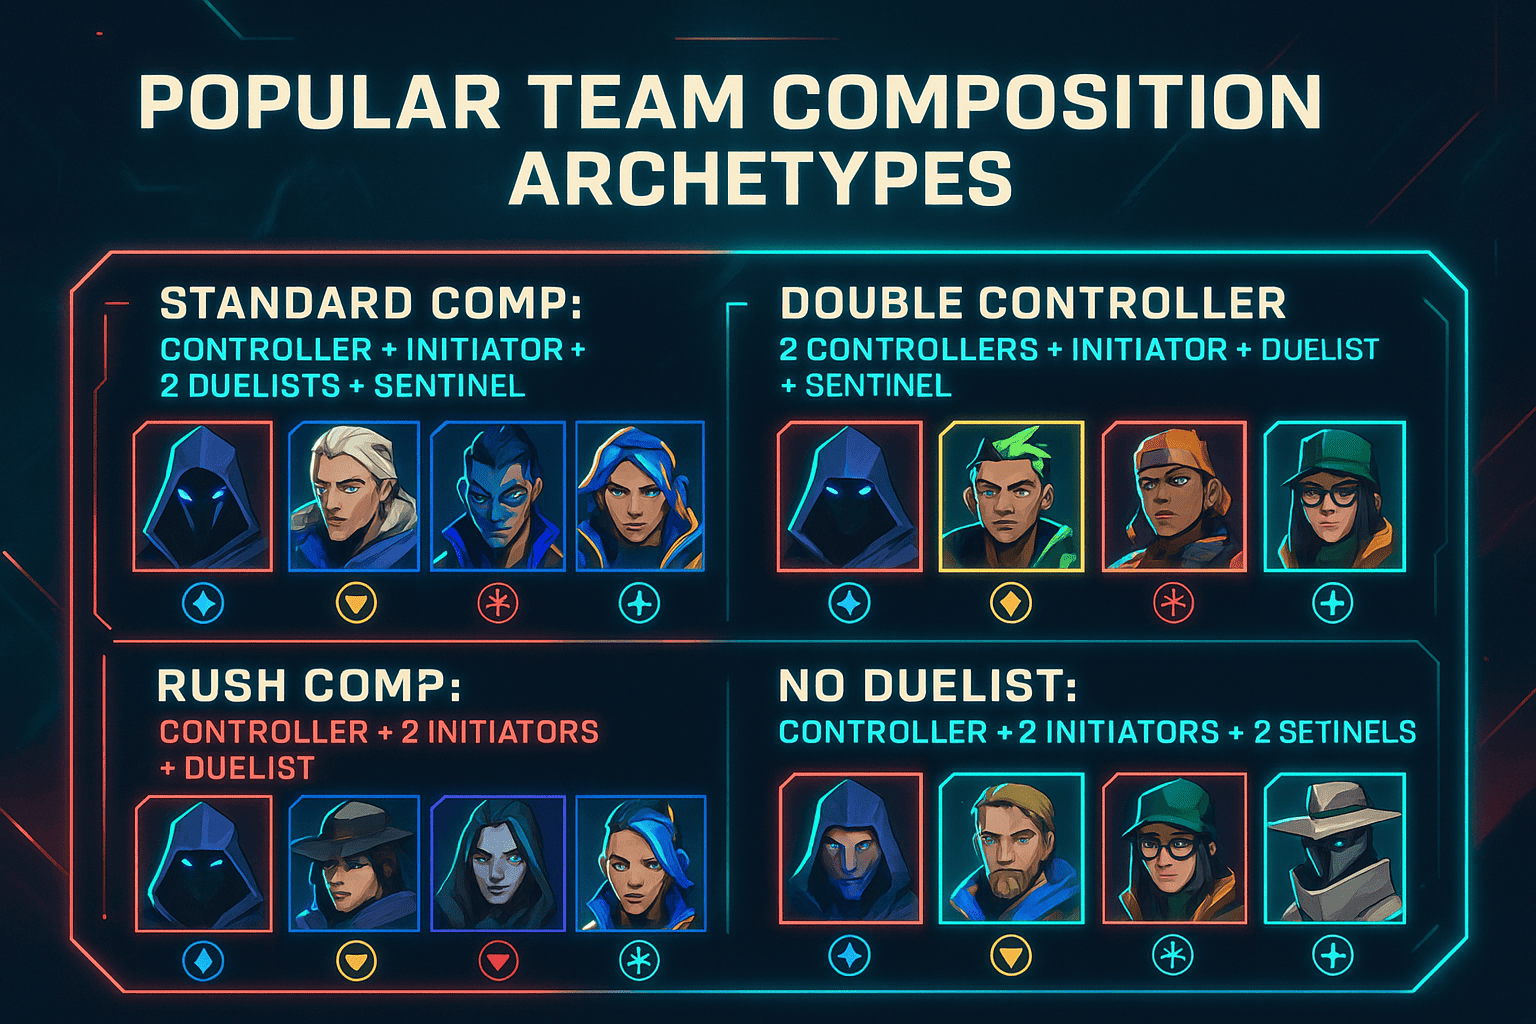
Popular Team Composition Archetypes:
- Standard Comp: Controller + Initiator + 2 Duelists + Sentinel (Omen, Sova, Yoru, Neon, Killjoy)
- Double Controller: 2 Controllers + Initiator + Duelist + Sentinel (Omen, Clove, Gekko, Raze, Vyse)
- Rush Comp: Controller + 2 Initiators + Duelist + Sentinel (Omen, Gekko, Fade, Neon, Sage)
- No Duelist: Controller + 2 Initiators + 2 Sentinels (Clove, Sova, Gekko, Killjoy, Cypher)
Counter the Enemy's Composition
Counter-picking requires analyzing enemy selections during draft phase. Against setup-heavy defensive compositions, Yoru dimensional drift bypasses prepared positions while Gekko utility clears defensive arrangements. These agents neutralize static advantages through mobility and utility clearing.
Speed-focused compositions become vulnerable to area denial through Vyse walls and Clove decay effects. Defensive tools force aggressive players into unfavorable engagements or extended round timers that favor prepared defensive positions.
| Enemy Composition | Counter Strategy | Recommended Agents | Reasoning |
|---|---|---|---|
| Heavy Sentinel Setup | Utility clearing | Gekko, Sova, Breach | Creature abilities bypass traps |
| Speed Rush Comp | Area denial | Vyse, Clove, Raze | Walls/decay slow pushes |
| Double Controller | Fast executes | Yoru, Neon, Phoenix | Mobility bypasses smokes |
| Information Heavy | Anti-intel | Yoru, Clove | Teleports avoid detection |
| No Duelist Comp | Aggressive pressure | Raze, Neon, Gekko | Force unfavorable fights |
Prioritize Personal Comfort and Playstyle
Tier rankings provide strategic guidance rather than absolute requirements. Mastery of b-tier agents often produces superior results compared to inexperienced play on s-tier picks. Personal comfort and consistent performance outweigh small tier advantages when climbing ranks.
Players with strong mechanical skills might excel with Jett despite lower tier placement, while tactically-minded players find success with Cypher's information-based gameplay. Perfect agent selection balances meta viability with individual competency and sustained enjoyment factors.
"Mastery > Meta" - Consistent performance with comfortable agents outweighs forced meta picks that don't match individual playstyles, mechanical skill levels, or strategic understanding. A skilled Jett player will always outperform an uncomfortable Yoru selection.
Advanced Tier List Insights
Patch Impact Analysis
Recent patches significantly altered agent viability through ability cost changes and damage modifications. Economic adjustments affected utility usage patterns while ability nerfs targeted overpowered mechanics. Understanding these changes helps predict future meta evolution patterns.
Historical patch patterns show Riot addresses overpowered agents through utility nerfs rather than fundamental kit changes. Underperforming agents receive buffs to specific abilities or cost reductions. This knowledge enables proactive adaptation to meta shifts before they stabilize.
Major Patch Changes Timeline:
- Patch 11.02 (July 2025): Vyse introduction reshapes sentinel meta
- Patch 10.07 (May 2025): Yoru buffs elevate dimensional drift effectiveness
- Patch 10.04 (April 2025): Tejo nerfs reduce guided salvo damage output
- Patch 9.10 (Feb 2025): Sage buffs increase heal values, reduce ultimate cost
- Patch 8.11 (Dec 2024): Neon movement buffs match strafe speed with forward speed
- Patch 8.05 (Oct 2024): Chamber teleporter changes shift sentinel priorities
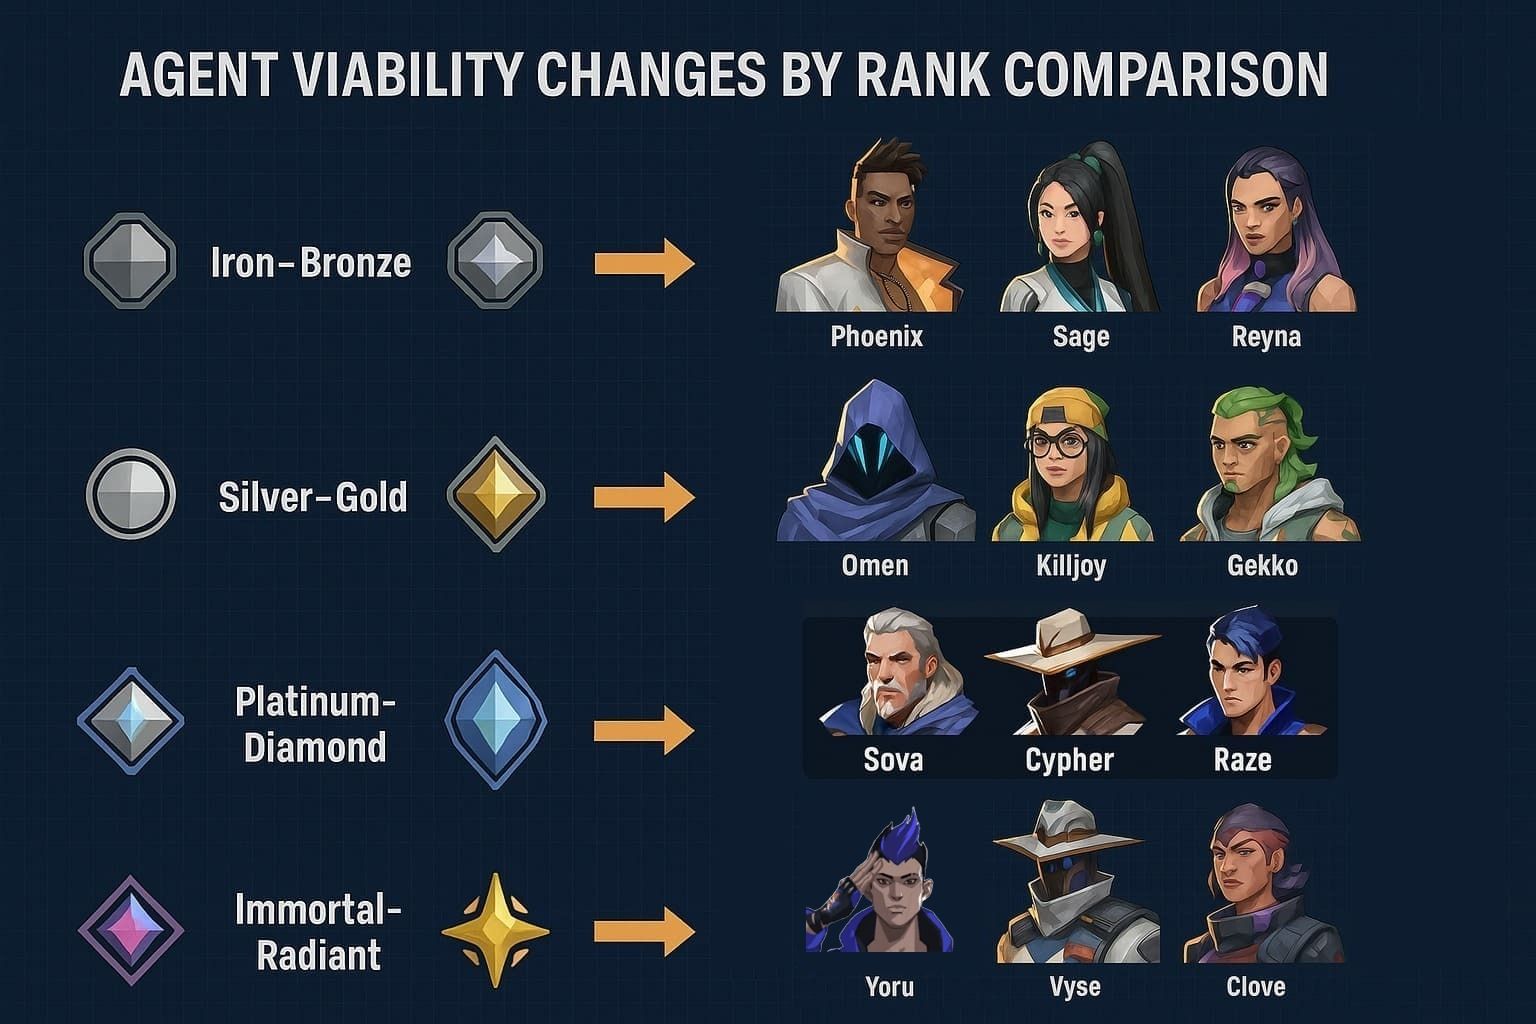
Skill Level Considerations
Agent effectiveness varies significantly across rank brackets due to mechanical requirements and coordination needs. Yoru demonstrates exceptional potential in high-level play but requires precise execution making him ineffective for developing players without advanced game sense understanding.
Lower ranks favor self-sufficient agents like Phoenix and Sage who don't rely on team coordination. Higher ranks reward utility-focused agents like Sova and Vyse whose abilities become impactful with improved communication and strategic understanding development.
Agent Viability by Rank:
- Iron-Bronze: Phoenix, Sage, Reyna (self-sufficient, low coordination needs)
- Silver-Gold: Omen, Killjoy, Gekko (moderate utility learning curve)
- Platinum-Diamond: Sova, Cypher, Raze (team coordination becomes valuable)
- Immortal-Radiant: Yoru, Vyse, Clove (complex abilities reward high-level execution)
Common Tier List Mistakes to Avoid
The most frequent error involves constantly switching agents based on tier list updates rather than developing consistent mastery. Meta changes require adaptation time, and jumping between agents prevents skill development that determines rank progression more than agent selection alone.
Over-prioritizing professional meta without considering ranked differences creates suboptimal choices. Professional teams coordinate extensively, making utility-dependent agents more viable than solo queue environments where communication varies significantly across different skill levels and team coordination.
Top 5 Tier List Mistakes:
- Meta Chasing: Constantly switching agents based on patch updates instead of developing consistent mastery
- Pro Play Imitation: Copying professional team compositions without proper coordination infrastructure
- Tier Obsession: Ignoring personal comfort and mechanical skill for theoretically stronger picks
- Skill Level Mismatch: Choosing mechanically demanding agents before developing fundamental game sense
- Role Inflexibility: Refusing to adapt agent selection based on team composition needs and map requirements
Practice & Confidence Are Your True S-Tier Tools
This comprehensive valorant agent tier list provides strategic framework for selection decisions, but individual improvement remains the primary factor in competitive success. Understanding agent strengths creates informed decision-making foundations that enhance tactical gameplay across all skill levels.
Map knowledge, team communication, and consistent mechanical performance determine match outcomes more than tier rankings alone. The tier list serves as strategic guidance, but personal development and confident execution navigate the path to higher ranks and improved performance.
First 3 Action Items for Immediate Improvement:
- Master 2-3 agents across different roles: Focus depth over breadth to develop muscle memory and advanced technique understanding rather than superficial knowledge of entire roster
- Study map-specific positioning and utility placement: Learn common angles, default positions, and advanced setups for chosen agents to maximize utility effectiveness and impact potentialPractice team coordination and communication: Develop callout vocabulary, timing coordination, and utility combination sequences to enhance collaborative gameplay and strategic execution