CS2 Vertigo callouts are the location names players use to mark positions on a map split across two stacked floors. Mid, A Ramp, Sandbags, Heaven, Electric Box, and Connector live on the upper floor. Tunnels, Bridge, B Lowe, and Bottom Ladder sit on the lower floor.
Every callout on this map needs a floor qualifier. A "ladder" call without "upper" or "lower" sends two teammates in opposite directions. The word "stairs" alone, with no "B" or "T" prefix, does the same thing. Vertigo map callouts punish vague communication harder than any other CS2 map in the active rotation.
The map currently lives in Competitive matchmaking rather than Active Duty. Valve removed it from the Active Duty pool in January 2025, so Premier no longer queues Vertigo, but the Competitive playlist still does. The two-floor design and dense alternative-name vocabulary still trip up players who learned other maps first. This guide to Vertigo Callouts CS2 covers every position on both floors, including the alternative names that change by region and team.
Key Takeaways
- Two floors, one rule. Always say "upper" or "lower" before any callout that could apply to either floor.
- Many names per location. Lane, Secret, and Sidewalk all describe the same corridor. Align with your team before queueing.
- The lower floor decides T-side rounds. Tunnels, Bridge, B Lowe, and the Ladder route shape every approach.
- Mid wins matches. Whoever controls the upper-floor Mid forces the opposing team into one bombsite.
- Bookmark the cross-reference table below. It collapses every primary callout, alternative, and floor into a single scannable list.
Vertigo Map Overview — Orienting Yourself Before Learning the Callouts
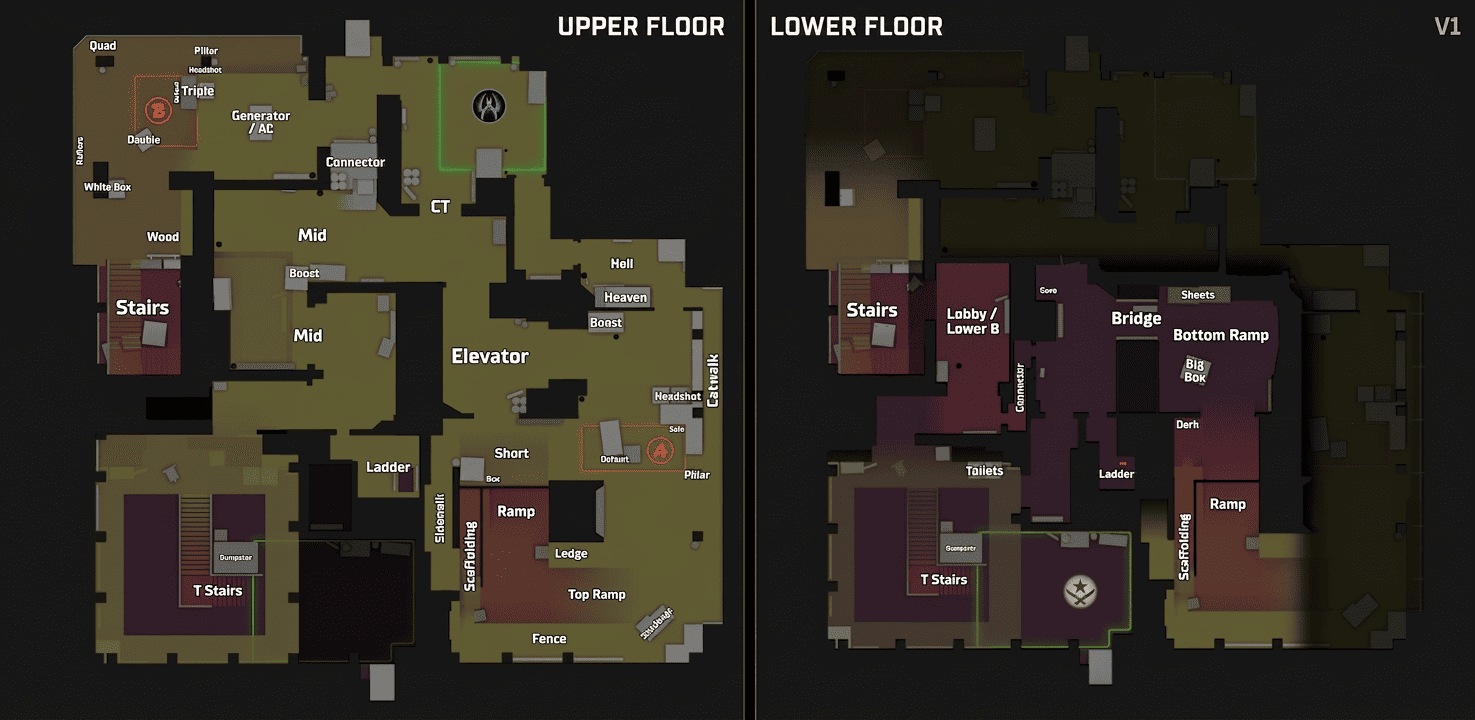
Vertigo sits on the upper floors of an unfinished skyscraper, with the playable area split across two stacked levels. Valve set the action on roughly the 50th and 51st floors of an in-construction tower. You can actually fall off the map.
Terrorists spawn on the lower floor. Counter-Terrorists spawn on the upper floor next to both bombsites.
Picture Vertigo as two separate maps stacked on top of each other. Upper-floor CS2 Vertigo callouts cover a tight three-lane bomb defusal layout. Lower-floor callouts cover a connector and approach network.
Two staircases, a ramp, and a ladder link the floors. Vertigo rewards players who master the vertical handoffs as much as the rooms themselves.
Upper Floor vs. Lower Floor — A Quick Orientation
Upper Floor Zones
- T Mid, Mid, Top Mid, Connector, Elevator
- A Site, A Ramp, Sandbags, Double, Heaven
- B Site, Electric Box, Back B, CT Spawn
Lower Floor Zones
- T Spawn (lower), Toilets, Lower Stairs
- Tunnels, Bridge, Underpass, B Lowe
- Bottom Ladder, Save Spot, Big Box
Players who internalize the floor split memorize individual callouts faster. The map's vocabulary stops feeling random once you anchor every name to one of these two levels.
Upper Floor Callouts — T Side Entry and Mid Control
Controlling Mid on Vertigo is the key to everything. Whoever wins the opening Mid contest forces the other team into a single site. T Stairs and Elevator stand as the two routes that make that contest happen.
That same Mid-control pattern shapes how analysts read pro matches. Teams that consistently win Vertigo Mid in the opening seconds control the round economy. The pattern stays consistent enough that you can open the PLG.bet sportsbook and watch it decide upper-bracket games on Vertigo specifically.
T Spawn (Upper) — Generator Area and Top T Spawn
Top T Spawn names the narrow upper platform directly above the lower T Spawn room. Generator marks the boxy machine right in front of T Stairs on the upper level. These two callouts often confuse newcomers because the lower T Spawn shares the name root.
Terrorists almost never hold fights from Generator. It works as a transition lane between Top T Spawn and the route into T Mid. If you call "Generator" mid-round, your teammates expect you to be passing through, not holding an angle.
T Stairs — The Vertical Gateway From Lower to Upper Floor
T Stairs connects lower T Spawn to the upper floor. The structure runs at a 90-degree angle, which forces a sharp peek at the top step. CTs sometimes pre-fire that exact corner.
B Stairs is a different staircase on the same map. Never substitute one name for the other.
T Stairs leads to Mid. B Stairs leads to B Site. Mix them up and your rotators end up on the wrong half of the map.
T Mid (T Main) — The Staging Area Before Mid
T Mid occupies the large upper-floor room between Generator and Mid proper. Some teams call it T Main, especially in EU communities. The room connects forward into Mid, sideways into Top Ladder, and backward into Generator and T Stairs.
Iron sits between T Mid and Mid; Boost sits near Top Mid. Call them precisely during executes. AWPers holding Top Mid punish vague references to either.
Mid — The Map's Central Battleground
Mid spans the wide upper-floor room linking T Mid, Top Mid, Connector toward B Site, and Elevator toward A Site. Community guides and pro analysts rank Mid as the most contested area on the map. Four routes flow into and out of it.
Treat Mid as a highway, not a holding position. Mid lacks usable cover for any extended hold. T players push through Mid to set up an A Site execute via Elevator or a B Site execute via Connector. CT players contest Mid to gather info, then fall back toward Sandbags or Back B.
Mid on Vertigo is not a place you hold. It is a place you contest and then immediately use.
Connector (CT Connector) — The Bridge Between Mid and B
Connector spans a raised wooden-plank platform linking Mid to the corridor between CT Spawn and B Site. Some players call it CT Connector for clarity. The platform sits above an open drop into the area near Cold and Drop.
Drop off Connector and you land near Drop, right at the B approach. Connector remains one of the most underused rotation paths at intermediate ranks. Strong CT teams use it to flank Terrorists who already committed to Mid.
Elevator (Lift) — The Fast Lane Between Mid and A
Elevator holds the room with the visible elevator doors and links Top Mid to A Site. Some teams call it Lift. The room sits between Mid and the side entrance to A Site, near Door and Heaven.
Whoever controls Elevator dictates whether an A execute runs through Mid or through A Ramp. CTs use it for the fastest rotation from Mid pressure back to A Site.
Upper Floor Callouts — A Site (Complete Zone Breakdown)
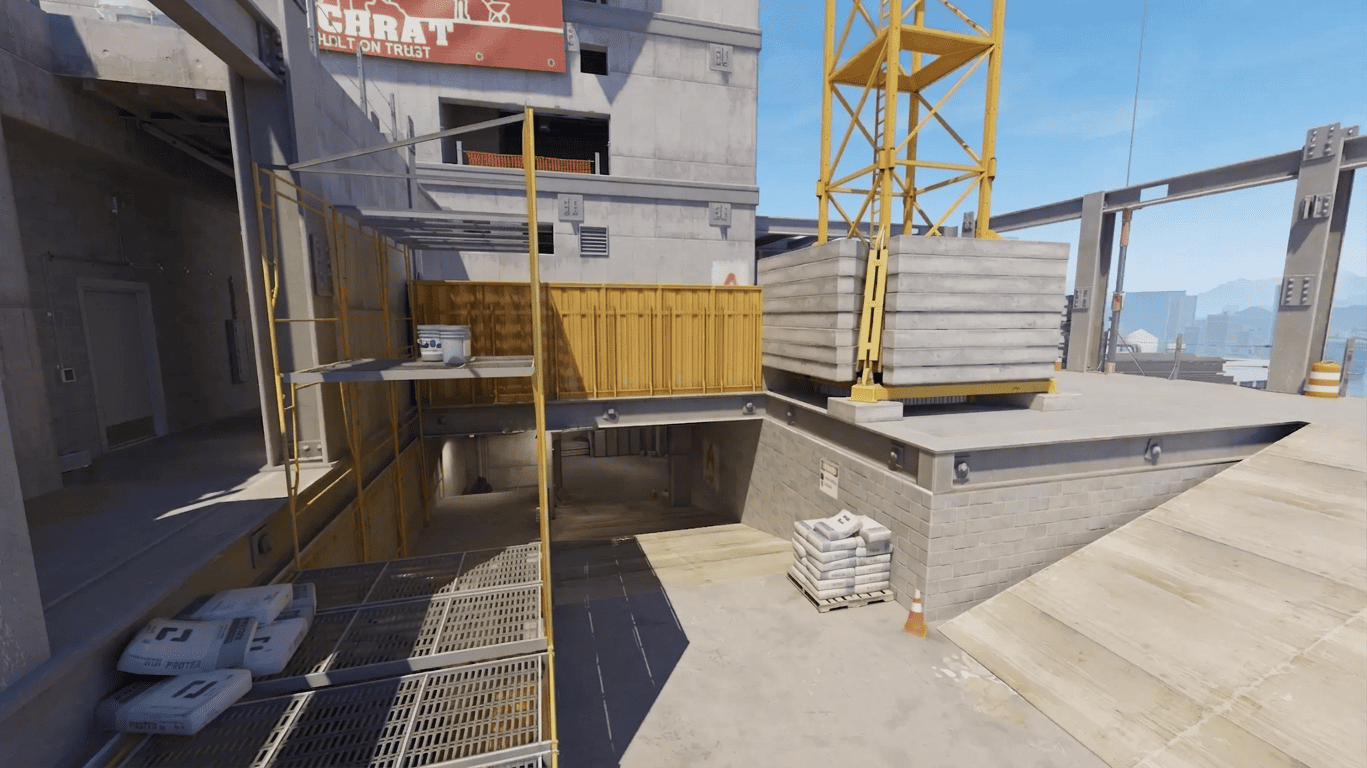
A Site, the more T-accessible bombsite, also packs the densest vertigo map callouts on the entire map. Ramp, Sandbags, Heaven, Catwalk A, Scaffold, Lane, Double, and Door all sit within a roughly 20-second sprint of one another. Several positions carry two or three community names each.
A Ramp — The Main T Entry to A Site
A Ramp climbs from the lower floor as the wide sloped path Terrorists use to enter A Site after Bridge. Sandbags, Fence, and Dark all hold sightlines onto the slope. Most successful A executes start with a flash thrown blind over the top of A Ramp.
Never push A Ramp without a flash in hand. The angles holding it stay too well-known. Sandbags alone covers most of the doorway at headshot height.
Scaffold (Yellow) — The Fast Route to Fence and Lane
Scaffold runs along a narrow elevated path behind A Ramp. Teams often call it Yellow for the structure's color. The route gives Terrorists a faster line toward Fence and Lane than the open A Ramp does. Players sometimes confuse Scaffold with Catwalk; the two sit on opposite sides of the site.
Scaffold is the most commonly misidentified callout for new Vertigo players. Pause your warmup and walk through it once before queueing.
Lane (Secret / Sidewalk) — The Hidden Corridor to Highway
Lane traces a narrow corridor behind the construction materials on Scaffold, ending at Highway. The same corridor carries three community names: Lane, Secret, and Sidewalk. Each region uses a different one as the default.
Align this callout with your team before every queue. Teams lose rounds when three players use three different names for the same wall corner. Pick one and stick with it.
Double (Tetris) — The Orange Containers Dominating A Site
Double stacks two orange containers on A Site. Teams often call it Tetris for the shape. CTs use it as the primary defensive position against A Ramp and Lane approaches. The stack creates a headglitch angle, meaning a defender can shoot while almost no hitbox is visible.
"CT at Double" is one of the most valuable intel callouts a T player can give. The headglitch advantage is worth setting up a 2-for-1 trade. Bring grenades, not just flashes.
Heaven and Door (Back Door) — The CT's A Site Entrance
Heaven holds the raised platform next to the A Site entrance from CT Spawn. Door is the narrow passageway that connects Elevator and CT Spawn to Heaven. Some teams call the corridor Back Door instead.
CS2 community wikis rank Heaven as the elevated CT position overlooking A Site. The platform holds sightlines down onto the bomb plant zone and across to Default A.
Lose Heaven control in the first 30 seconds and you usually lose the site itself. CTs who lose Heaven rarely recover the position without a full team reset.
Upper Floor Callouts — B Site and CT Spawn
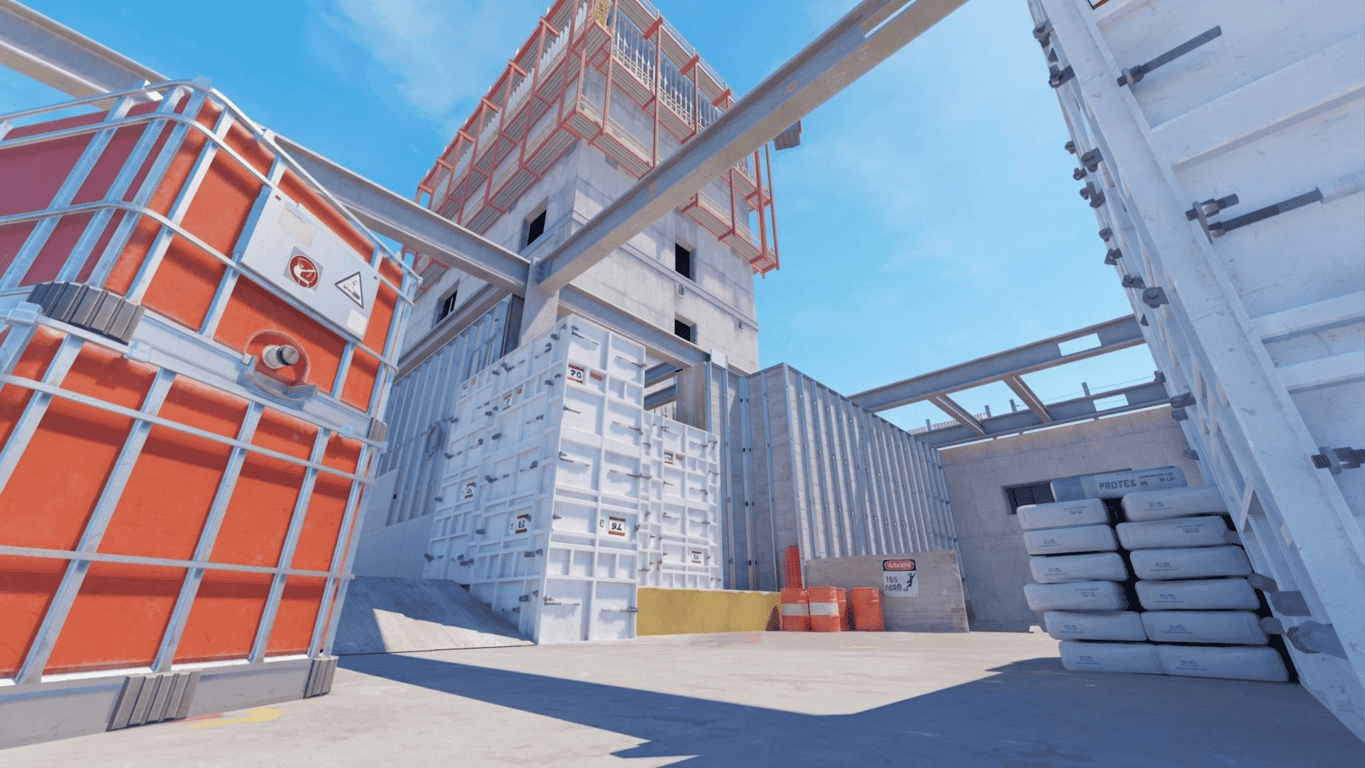
B Site stays the more compact of the two sites and rewards organized executes more than individual skill. The B-side CS2 Vertigo callouts pack tightly: Electric Box, Catwalk B, Back B, and Ninja all sit within a few steps of one another. The site rewards discipline because there is almost no room to outplay a coordinated defense.
Electric Box (Cooler / Elec) — The CT-Side B Approach Landmark
Electric Box marks the large metallic utility box between CT Spawn and B Site. Some teams call it Cooler or Elec. All three names describe the same object.
"Playing Electric Box" changes teammate rotation timing during a B execute. If a teammate calls a CT holding Electric Box, the entry man knows to throw a molotov instead of pushing blind. The box hides your full body from B Stairs sightlines.
B Stairs (B Ramp) — The Primary T Entry to B Site
B Stairs climbs from lower T Spawn to B Site. Some teams call it B Ramp. Both names cover the same route.
A standard B execute follows three steps.
Step 1: the support smokes Electric Box.
Step 2: the support flashes over B Stairs.
Step 3: the entry man pushes and calls either "clear" or "CT Under Stairs."
That sequence wins more B rounds than any individual mechanical highlight.
CT Spawn — The Counter-Terrorist Starting Zone
CT Spawn covers the upper-floor area where Counter-Terrorists start each round. The zone connects to Top Mid, Electric Box and B Site, Heaven and A Site, and Connector. CT Spawn functions as a rotation hub rather than a fighting position.
CT Spawn rotation times matter as much as the callout names themselves. "Rotating from CT Spawn" tells your teammates you arrive in approximately 6 seconds. That number changes how aggressively they can hold the contested site.
Lower Floor Callouts — T Side Routes, Tunnels, and Ladder Access
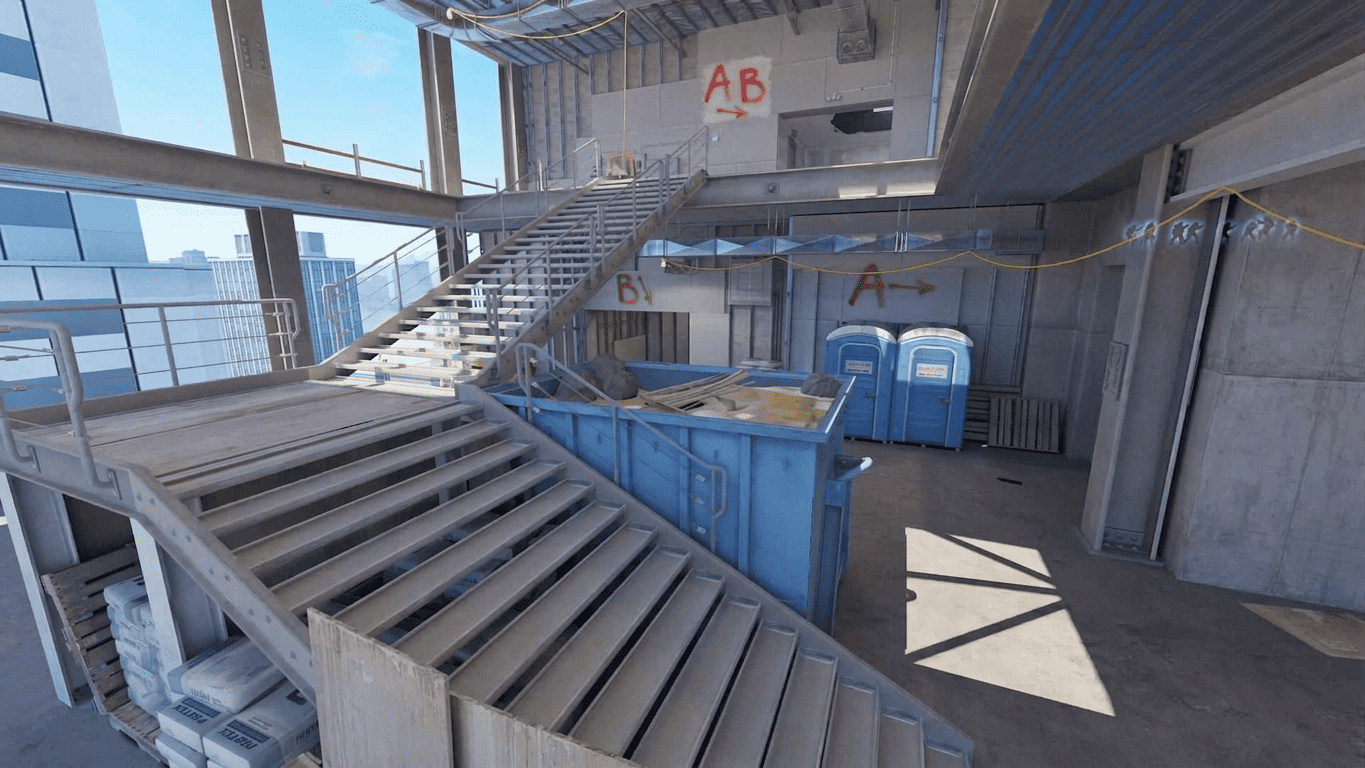
Most guides barely cover Vertigo's lower floor, which makes it the map's most misunderstood layer. Tunnels, Bridge, Underpass, B Lowe, and Bottom Ladder together shape every T-side approach.
Players who skip these CS2 Vertigo callouts lose half the map's strategic depth. Every route below leads somewhere useful.
Tunnels — The Lower Floor's Main Corridor
Tunnels runs as the wide corridor from lower T Spawn toward Bridge and the Bottom Ladder room. The corridor handles most horizontal movement on the lower floor. T players use it to choose between an A Ramp push, a B Lowe rotation, or a Bottom Ladder vertical play.
"I'm in Tunnels pushing Bridge" communicates position, direction, and destination in four words. That is the callout standard for the lower floor.
Bridge — The Lower Floor's Central Landmark
Bridge spans the lower floor as a metallic walkway linking Tunnels to the lower entry of A Ramp. The structure has gaps where dropped weapons can fall through and get lost. Players who toss a deagle mid-cross sometimes never see it again.
Bridge is the fork in the lower-floor road. From it, you push to A Ramp, loop toward B Lowe, or hold for information.
B Lowe (Hell) — The Lower Approach to B Stairs
B Lowe runs along the lower-floor corridor from Toilets to the base of B Stairs. Some teams call it Hell. Terrorists take the route as a direct lower-level path to B Site without crossing Mid.
Two players in B Lowe can time a split execute with two more pushing from B Stairs. The split makes B-site timing unpredictable for the defense.
Bottom Ladder and Ladder Room (Top Ladder) — The Vertical Connection
Bottom Ladder holds the lower-floor room containing the foot of the ladder up to the upper floor. Ladder Room, sometimes called Top Ladder, is the matching upper-floor exit room in the T Mid area. Some players spell it "Laddar" as a long-running community joke.
The Ladder route bypasses T Stairs and Generator entirely. A T player drops directly into T Mid from a route the CTs cannot see. Elevator and Ladder are the two non-staircase vertical connectors; Elevator serves CT-side rotations, Ladder serves T-side surprise plays.
Complete Vertigo Callouts Reference — All Names and Alternatives
This Vertigo Callouts CS2 reference cross-references pro-scene VODs, community Discords, and the regional vocabulary of players from EU, NA, CIS, and SA queues. Every primary callout sits alongside its alternative names. Legacy CS:GO terms carried directly into CS2, so players who still search for "vertigo callouts csgo" will find every position they remember.
The floor, zone, and a one-line description follow in the next columns. Save this section. You will use it more than the rest of the guide combined.
| Primary Name | Alternative Names | Floor | Zone | Description |
| Mid | Middle | Upper | Mid | Central upper room linking A and B routes |
| T Mid | T Main | Upper | Mid | Upper room between Generator and Mid |
| Top Mid | CT Mid | Upper | Mid | Section of Mid closest to CT Spawn |
| Generator | Gen | Upper | T Side | Object directly above T Stairs |
| Top T Spawn | Upper T | Upper | T Side | Narrow platform above lower T Spawn |
| T Stairs | T Steps | Upper | T Side | Staircase from lower T Spawn to upper floor |
| Iron | Iron Bars | Upper | Mid | Metal sheets between T Mid and Mid |
| Boost | Mid Boost | Upper | Mid | Stacked crates near Top Mid |
| Headshot | HS | Upper | Mid | Headglitch angle between Top Mid and Boost |
| Connector | CT Connector | Upper | B Approach | Raised platform between Mid and B Site |
| Elevator | Lift | Upper | A Approach | Room linking Mid and A Site |
| A Site | Bombsite A | Upper | A | Upper-floor plant zone near Ramp |
| A Ramp | Ramp | Upper | A | Sloped main T entry to A Site |
| Sandbags | Bags | Upper | A | Cement bags at the top of A Ramp |
| Scaffold | Yellow | Upper | A | Narrow elevated path behind A Ramp |
| Lane | Secret, Sidewalk | Upper | A | Hidden corridor between Scaffold and Highway |
| Highway | Long A | Upper | A | Long sightline approach to A Site |
| Dark | Dark Corner | Upper | A | Shadowed lower section of A Ramp |
| Double | Tetris | Upper | A | Stack of two orange containers on A |
| Default A | Plant A | Upper | A | Standard plant spot on A Site |
| Backside | Back A | Upper | A | Rear corner of A Site |
| Catwalk A | Cat A | Upper | A | Side platform connecting Double to Ramp |
| Fence | Far Ramp | Upper | A | Raised platform opposite Sandbags |
| Heaven | (none) | Upper | A | Raised platform above A Site entrance |
| Haven | Top Ramp area | Upper | A | Side corridor between CT Spawn and A Site, reached via leftmost CT path |
| Door | Back Door | Upper | A | Passageway from Elevator to Heaven |
| B Site | Bombsite B | Upper | B | Compact plant zone near CT Spawn |
| Electric Box | Cooler, Elec | Upper | B | Metallic utility box near B |
| B Stairs | B Ramp | Upper | B Approach | Staircase from lower T Spawn to B Site |
| Under Stairs | Under B | Upper | B | Area beneath B Stairs |
| Catwalk B | White | Upper | B | Elevated platform overlooking B |
| Back B | Quad | Upper | B | Rear corner of B Site |
| Default B | Plant B | Upper | B | Standard plant spot on B |
| First | Container 1 | Upper | B | First container near B Stairs |
| Second | Container 2 | Upper | B | Second container near B Stairs |
| Ninja | Ninja Spot | Upper | B | Hidden hold position near plant |
| Cold | Cold Corner | Upper | B Approach | Corner between CT Spawn and Drop |
| Drop | Mid Drop | Upper | B Approach | Drop point under Connector |
| Under Mid | Mid Underneath | Upper | B | Lower angle beneath Mid platform |
| CT Spawn | CT | Upper | CT Side | Counter-Terrorist starting zone |
| T Spawn (lower) | Spawn | Lower | T Side | Terrorist starting zone |
| Toilets | Porta Potties | Lower | T Side | Two portable units near T Spawn |
| Lower Stairs | Bottom Stairs | Lower | T Side | Staircase on the lower floor |
| Tunnels | Lower Corridor | Lower | T Side | Main corridor from lower T Spawn |
| Underpass | T Connector | Lower | T Side | Corridor connecting Bridge to B Stairs |
| Bridge | Metal Bridge | Lower | A Approach | Walkway linking Tunnels to A Ramp area |
| 50 | Fifty | Lower | A Approach | Bridge sub-callout for the midpoint |
| Save Spot | Hide | Lower | T Side | Concealed corner near Tunnels |
| Sheets | Plastic Sheets | Lower | T Side | Hanging covers near Big Box |
| Big Box | Crate | Lower | T Side | Large container near Bridge |
| Dog | Dog Corner | Lower | T Side | Corner near Tunnels |
| B Lowe | Hell, B Lower | Lower | B Approach | Lower corridor toward B Stairs |
| Bottom Ladder | Ladder | Lower | Vertical | Lower-floor ladder room |
| Top Ladder | Ladder Room, Laddar | Upper | Vertical | Upper-floor ladder exit in T Mid |
How to Use Vertigo Callouts Effectively in CS2 Matches
Knowing every callout name is step one. Step two: use them in real time under pressure. Strong CS2 teams apply the names under fire. Weaker teams freeze and describe instead.
Teams worth watching on a serious esports betting site like PLG.bet lock callouts before the first shot. Squads that lose the callout war lose the round.
Always Specify the Floor — Upper or Lower
Specify the floor before any potentially ambiguous callout. No other habit matters more on Vertigo. "CT on stairs" is ambiguous: it could mean T Stairs, B Stairs, or Lower Stairs. "CT on upper B Stairs" is precise: it tells your teammates exactly which staircase, which floor, and which threat to expect.
A "ladder" call without a floor qualifier sends two teammates rotating in opposite directions. Add "upper" or "lower" before any potentially ambiguous callout. The fix costs nothing and saves rounds.
Keep Callouts Short, Consistent, and Immediate
Effective callouts stay brief, stay consistent, and land before you finish processing what you saw. A sentence-length description arrives too late.
Do This vs. Not This:
- "CT Electric Box" beats "someone behind the orange boxes at B"
- "Two A Ramp" beats "I heard footsteps near A"
- "One Heaven low HP" beats "I damaged the guy on the platform"
- "Rotating B from CT" beats "moving over to the B side"
- "Smoke Sandbags now" beats "throw a smoke up there"
How to Learn All These Callouts Without Overwhelming Yourself — A Progressive System
Learn one route per session. Walk it in Practice mode and say each name out loud. Four sessions cover the map.
- T-side upper: T Spawn, T Stairs, Top T Spawn, Generator, T Mid, Mid.
- B Site: Connector, Drop, Electric Box, Catwalk B, Back B, Ninja, B Stairs.
- A Site: Elevator, Door, Heaven, Sandbags, Double, Lane, Scaffold, A Ramp.
- Lower floor: Toilets, Tunnels, Underpass, Bridge, B Lowe, Bottom Ladder.
The journey teaches vocabulary faster than the list.
Why Vertigo Callouts Are Different From Every Other CS2 Map
Every CS2 map demands a callout vocabulary. Vertigo Callouts CS2 add floor-vocabulary on top of position-vocabulary. The two-floor design and dense alternative-name list make Vertigo map callouts harder to master than callouts on any flat map in the rotation.
Most CS2 players lose more Vertigo rounds to bad communication than to bad aim. The frustration runs deep. A fix exists: structured floor-specification combined with team-level callout alignment. Memorization volume alone never works.
The Two-Floor Problem — And Why It Creates Communication Breakdowns
Vertigo splits its key zones across two stacked floors, which means many callouts could plausibly apply to either level. A "Bridge" call usually points to the lower-floor walkway, but newer players sometimes confuse it with the connector area. The word "stairs" alone, with no floor qualifier, sends teammates to the wrong staircase entirely.
Players neglect floor specification more than any other aspect of Vertigo communication at intermediate ranks. Mid sits on the upper floor only. A Site and B Site sit on the upper floor only.
The lower floor handles approach and rotation. Stating the floor turns an ambiguous call into a usable one.
How Alternative Callout Names Create Confusion (And How to Handle It)
Vertigo carries a higher-than-average density of locations with multiple community names. Players who still search for "cs go vertigo callouts" from the legacy game will find most names unchanged. Sandbags stays one of the few positions with a single universal name; most others carry two or three regional alternatives.
The most commonly confused alternative names include:
- Electric Box, Cooler, and Elec for the same utility box near B
- Lane, Secret, and Sidewalk for the same A Site corridor
- Double and Tetris for the same orange-container stack on A
- Scaffold and Yellow for the same elevated path behind A Ramp
- Fence and Far Ramp for the same defensive platform
Learn the most common name first, then layer in the alternatives. The cross-reference table above resolves the conflict permanently. Run through five questionable callouts as a 60-second warmup before any serious Vertigo session.
Conclusion — From Callout Confusion to Map Mastery on Vertigo
Vertigo Callouts CS2 knowledge is a genuine competitive advantage, not a vocabulary exercise. The two-floor design rewards coordinated teams over individually-skilled teams that fail to communicate. Players who learn every alternative name and specify the floor on every call rotate faster, trade better, and win more rounds.
Regional vocabulary will keep evolving. Align with your team on the most ambiguous callouts before every match. Lane, Electric Box, Double, and Scaffold stand as the four worth confirming. Bookmark the reference table above, practice one route's callouts per session, and use Practice mode before ranked queues.